Wednesday, April 16, 2008

Garden Journal Entry 4/16/08: My Favorite No Maintenance Flowering Perennial Bush


Ah, Spring!

Realization of the day:
I have no idea what this bush is but I love it. (Update: It's a flowering quince!)

It was here when I moved in and is definitely my kind of plant: it flourishes in our crazy Missouri climate, requires no special treatment (or even attention), doesn't grow quickly enough to need pruning or shaping, and is never bothered by disease or destructive insects.


In early spring it's covered with these delightfully bright blossoms that pretty much scream the word happy and attract swarms of bees and other pollinators (you can see a close up photo of the flowers here). This bush is located on the south side of The Shack next to the clothesline, so right now hanging up the laundry - an activity I always find fairly pleasant - is even more enjoyable. My only complaint? The flowers don't stick around for very long. Well, that and the fact that you can't eat them.

So does anybody know what this mystery bush is? If we figure it out, then you'll be able to go find one for your own yard.

Do you have a wonderfully low maintenance perennial plant in your yard or garden? Please tell us about it!

© 2008 FarmgirlFare.com, the blooming foodie farm blog where if it isn't edible, then it had better be pretty - and thrive on serious neglect.

Saturday, April 05, 2008

Attention Homeless Organic Vegetable Lovers: Would You Like To Move To A Farm?


Your New Home Sweet Home?

FOR RENT: Charming cottage on a beautiful biodynamic farm. Separate, private 700 square foot building has one bedroom, cathedral knotty pine ceilings, gas stove and heat, washer/dryer in unit, dishwasher, wifi dsl, cable, and an outside large storage unit. Rent is $1200 per month and includes all the heirloom tomatoes you can eat. Separate utilities charge of $100 per month includes: PG&E (electric), full cable, wifi dsl, garbage, and water. Deposit is $2000. No smoking allowed inside or outside. Cat ok, well-behaved small dog that doesn't chase cats ok. Cottage will be shown the weekend of April 12 and 13 and will be available for occupancy around the same time.

Unfortunately this cute little place isn't located here on my farm, because if it were you can be sure we'd be living in it instead of in The Shack! It's actually somewhere even better - on Love Apple Farm which is located in the Santa Cruz mountains near the central California coast. It's halfway between San Francisco and Monterey, and about a half hour's drive to the beaches in Santa Cruz.

My new foodie friend Cynthia Sandberg lives on and operates Love Apple Farm, a two-acre biodynamic paradise which originally became known for growing 100 varieties of heirloom tomatoes each year. It is now the exclusive kitchen garden for world-renowned Manresa Restaurant in Los Gatos, California.

As soon as I read about the cottage I was ready to pack up and move back to California. But since Bear chases cats, and I doubt I can afford to feed my sheep veggies destined for a Michelin two-starred restaurant, I guess we'll have to stay where we are. Besides, Cynthia told me that "the chef at Manresa would certainly insist I try my hand at making sheep's milk cheese if we had any sheep here - so you better stay put since I don't need any more chores!"

Since that pretty much settled it, I figured I'd spread the word about this fantastic opportunity in case any of you are looking for a wonderful new place to live. I also asked Cynthia for some of the food and garden related details regarding the rental. Here's what she said:

"Tenants sometimes get to partake of our often excess amounts of stuff. For example, I've got a whole bed of radishes that needed pulling to make way for the tomatoes and the restaurant just cannot use that many at one time. And of course, all the tomatoes everyone can possibly eat are available, as I grow way more than the restaurant can use of those. You can take the girl out of the tomato patch, yadda yadda yadda.

"Residents here are always rewarded for lending a hand, as our my volunteers. If I'm thinking straight when they leave, I will forage around and get a bag of goodies for them to leave with. We sometimes have extra eggs, too, because on the occasion that the restaurant is closed for a few days (happens several times a year), then the hens don't stop and we're eating an awful lot of omelettes around here.

"Oh, and all my residents and tenants can partake of any of my gardening classes for free: Growing a Summer Veggie Garden, Tomato Masters Class, Installling Drip Irrigation, Tomato Cage Making, Sowing and Tending Tomato Transplants from Seed, Keeping Chickens, and Growing a Winter Veggie Garden."

If all of this isn't tempting enough, you also get to share the farm with Dali, the enormous pot bellied pig who "continues to delight and terrify small children and their parents."

You can see more photos of the cottage here. If you'd like more information about the cottage you can email Cynthia at loveapplefarm AT gmail DOT com. And if, like me, you can't make the move but love great gardening tips, be sure to check out Cynthia's wonderful blog, Grow Better Veggies. Do you already live near Love Apple Farm? The 2008 Tomato Seedling Sale is going on now through May 31.

© 2008 FarmgirlFare.com, the award-winning blog where we love our crazy country life on 240 remote Missouri acres - even if we don't get to share it with an enormous pot-bellied pig.

Tuesday, March 25, 2008

Grow Your Own: A Monthly Blogging Event You Can Sink Both Your Teeth & Your Hoe Into!

Are you a gardener who blogs or a food blogger who gardens? If so, my foodie friend Andrea has a delicious monthly blogging event for you! Grow Your Own "celebrates the foods we grow or raise ourselves and the dishes we make using our homegrown products."

All you have to do is make a dish that uses at least one item from your very own garden or farm and write about it on your blog. You can use something that was given to you, but the giver must have personally grown or raised the item.

Anything edible that you have grown or raised qualifies, including fruits, vegetables, herbs, sprouts, edible flowers, nuts, grains, legumes, dairy products, eggs, and livestock. Produce from both indoor and outdoor gardens are welcome!

The deadline for Grow Your Own #8 is March 28th, but you're welcome to enter any qualifying post from the month of March. Just check out the simple Grow Your Own rules and help yourself to one of the fun GYO badges. Below the rules you'll find links to all the previous Grow Your Own roundups, which are published around the 1st day of each month. There's even a Grow Your Own Flickr photo group where you can share photos, too.

Maybe you're a homeowner like Andrea who is turning her backyard into an edible paradise, or you're a top floor apartment dweller with a single pot of rosemary on a sunny windowsill. No matter where you live or what you grow, you're invited to join in the Grow Your Own fun. I wrote about Onion & Herb Crusted Lamb Spareribs and Grilled Lamb Steaks for GYO #7 and am hoping to have another homegrown lamb recipe posted in time for GYO #8. I can't wait to see what everybody else cooks up this spring and summer!

In the meantime, what are some of your favorite things to do with homegrown goodies? If you've shared a recipe on your own blog, feel free to leave a link to it in the comments section.

© 2008 FarmgirlFare.com, the award-winning blog the cooking style Less Fuss, More Flavor - and we don't consider ourselves strange just because we sometimes pick gourmet lettuce in the dark so that it's really, really fresh. A little obsessive maybe, but definitely not strange.

Sunday, March 09, 2008

Herbs In & Out Of The Garden: Tips For Growing & Using Rosemary


Rosemary thriving in the homemade greenhouse despite single digit temps.

This was supposed to be a quick post about one little plant in the greenhouse and a new lamb recipe on my food and farm blog, Farmgirl Fare, but somehow it turned into a rambling rosemary learning experience. Now if only I could get my rosemary to ramble this much.

It took me a long time to get up the guts to put a rosemary plant in the ground. I used to keep it in a pot - setting it out in the garden when it was warm, and then moving it into the greenhouse in fall.

When it started getting really chilly, I would bring the pot indoors and set it a few feet from the woodstove in the living room, next to the only available window that receives any measurable sunlight. Within days it would start happily putting on cheerful new growth, and then several weeks later it would die.

Each spring I would buy a new little rosemary plant and the cycle would begin again. This went on for years.

Finally two autumns ago I decided that I should take my chances and transplant my rosemary into one of the raised beds in my homemade, not airtight, and almost always unheated greenhouse instead of bringing it into The Shack. I was nervous, but I figured I had nothing to lose except my beloved little plant that I was planning to murder in a month or two anyway. So I did it. And boy am I glad that I did.


Fresh vs. dried rosemary - there's simply no comparison.

The little plant took off, and now I'm now able enjoy freshly picked rosemary all year long, even when there's snow on the ground. On winter nights I drape it with floating row cover, and when the temperatures really plummet I add an old bedsheet or lightweight blanket, held up off the plant with short sections of bamboo stakes. During the day I uncover it.

It's been as cold as 7 degrees F in there, and yet my rugged rosemary didn't even flinch.


I'm still not sure why I kept killing my rosemary plants in the living room; the gardening books and websites I looked at while working on the post make it sound like everyone except me is able to easily grow rosemary in pots both indoors and out. I know it's warm near the woodstove, but rosemary is a Mediterranean plant that loves heat.

This expert rosemary grower, however, says that when kept indoors rosemary prefers temperatures around 60 degrees. It's possible it was too close to the sometimes icy-cold window, or it might not have been getting enough sun. Or I may have watered it too much. Who knows.

I did relearn an important thing to keep in mind when growing anything in containers, and that is that even if you move them to a warm and sheltered spot, the roots are still much more susceptible to cold that they would be if they were buried in the ground.

A friend pointed this out when I called him last month for 9-1-1 herbal advice regarding the beautiful but now rather dead looking rosemary topiary I'd bought for myself last December after surviving an all day bakery building supply mission to Lowe's.

I assured him the plant hadn't frozen because it had been in the greenhouse and covered. But it was in a flimsy plastic pot that offered no protection from what I'd thought were tolerable temperatures. We learn by mistakes, and this year one of my goals is to stop killing rosemary.


Growing up I never cared for rosemary, despite the fact that we had an enormous rosemary bush in our Northern California backyard. But when I moved to the country and planted a large kitchen garden I was determined to grow it, along with several other herbs I never used, like sage.

There's just something so alluring about growing herbs, even if half of them are simply for show. After all, most gardens and landscaping are only for show.

I am trying to be a better herb eater, though, as evidenced my past pleas for help regarding
what to do with lemon thyme and purple basil. Anyway, somewhere along the line I fortunately developed a taste for rosemary, and now I love the stuff.


Fresh rosemary shines in these Herb Crusted Lamb Spareribs

I suppose this was inevitable since I raise sheep, and lamb and rosemary are a match made in culinary heaven. Unless we're quickly tossing some plain chops or leg steaks on the grill (it's so nice when your meat has enough flavor to stand on its own!), pretty much all the lamb we eat is has been seasoned with rosemary.

You'll find one of my favorite ways to combine rosemary and lamb (pictured above) in my recent post on Farmgirl Fare,
How To Cook Lamb: Onion & Herb Crusted Lamb Spareribs & Grilled Lamb Leg Steaks.

According to About.com: Gardening, the three fundamentals for successfully growing rosemary are: full sun (6 to 8 hours a day), good drainage, and good air circulation.

Rosemary doesn't require much attention, but to keep your plants from becoming scraggly you should prune them back hard after they flower in summer - just don't cut them all the way back to the old wood.


You can buy rosemary seeds, but germination of the best seed available is only around 20%. Instead, look for healthy, preferably organically grown plants at nurseries or natural foods stores. Or better yet, see if you can swipe some cuttings from a friend, then follow these easy instructions from Fine Gardening to root them.

My herb growing and bread baking pal Beth (aka kitchenMage), who lives in the Pacific Northwest where rosemary thrives, says she starts 50 to 100 rosemary cuttings each year and doesn't even bother using rooting hormone. If you're feeling particularly lazy, try plunking the cuttings in a glass of water and setting them on a sunny windowsill; there's a chance they'll develop roots.

Despite the fact that I grow several different types of basil, thyme, and mint, for some reason I've always thought of rosemary as just being rosemary. But of course it isn't.

From Creeping Rosemary, a tall ground cover that can cover eight to ten feet in diameter or trail down eight to ten feet from a second story balcony, to Blue Boy, that grows out only about 12 inches wide and rarely gets over six inches tall, to Shimmering Stars, a trailing rosemary with pink flower buds that open medium-blue to lavender and is great for making topiaries, there's sure to be a variety of rosemary out there to fit your every taste and space. You can read about several other types of rosemary
here and here (scroll down).

Easy Rosemary Focaccia 2 FarmgirlFare.com
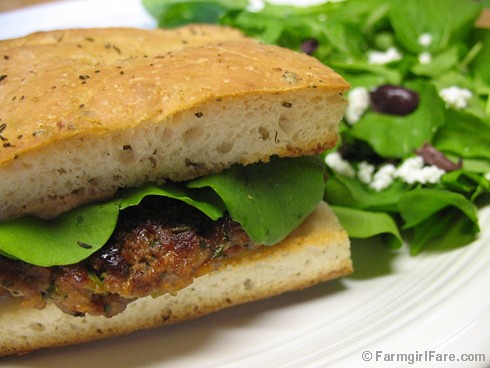
Lamb burgers with rosemary, shallots, and feta on focaccia 'buns' (lamb burger recipe here and focaccia recipe here)

At least I was aware that rosemary has a life beyond lamb. This versatile, aromatic herb can be used in everything from salad dressings to sorbets. I made some scrumptious and easy rosemary focaccia recently (my first foray into focaccia!), and I created a separate category on del.icio.us just for rosemary recipes I hope to try someday.


This Pane di Ramerino (Italian Rosemary Raisin Bread) is another favorite way to enjoy rosemary.

Rosemary's usefulness extends far beyond the tastebuds, too. According to Rosemary Gladstar in her wonderful book, Rosemary Gladstar's Family Herbal: A Guide To Living Life With Energy, Health, And Vitality, "We've only begun to uncover the many uses of rosemary."

She goes on to say that this evergreen member of the mint family has long been renowned as a memory aid, produces a tonic effect on the nervous system, and is good for circulation. It also strengthens the heart and reduces high blood pressure.


According to Kitchen And Herb Gardener, an enormous beauty of a book by Richard Bird and Jessica Houdret, rosemary can be taken internaly as an infusion for colds, influenza, fatigue, and headaches, and can be applied externally in massage oil for rheumatic and muscular pain.

In addition, rosemary has been used for hundreds of years as a cosmetic herb for its benefical effects on the hair and skin. Infusions are used as rinses for dry hair and dandruff and added to bath lotions and beauty preparations.


You can include rosemary as part of an invigorating bath blend to help aching joints and tiredness, or when preparing a warm herbal footbath, which can help with headaches and mental stress. Its fragrance and texture also makes it excellent for use in potpourris and insect-repellent sachets.

Hmmm. It sounds like I need to add at least a few more rosemary plants to the garden. Don't worry - I'll be sure to let them know that murder isn't on the agenda.

So do you grow rosemary? How do you like to use it? If you've written about rosemary or shared a favorite rosemary recipe on your own blog, feel free to leave a link to your post in the comments section.

© FarmgirlFare.com, the greenthumb foodie farm blog where we figure that if you're gonna go to the trouble grow it, you might as well be able to eat it.

Thursday, February 14, 2008

Garden Journal Entry: I Heart Sheep Manure


And I Found This Rock In The Barnyard To Prove It

Happy Valentine's Day!

Several years ago I started collecting heart shaped rocks I found around the farm, and I now have over 200 of them. I think of them as little signs - and sometimes their meaning is quite obvious.

So what do you love about gardening?

© 2008 FarmgirlFare.com, the award-winning blog where everybody contributes to the garden - in some way or another.

Wednesday, January 30, 2008

Grow Better Veggies Blog, More About Kohlrabi, & Ten Chances To Win 5 Packets Of Organic Heirloom Tomato Seeds


Heirloom Inspiration From A Summer Past

Great gardeners must think alike, because Cynthia Sandberg posted "Kohlrabi: A Kick-Ass Winter Veggie" on Love Apple Farm's Grow Better Veggies blog the same day I posted "Let's Trade: Your Kohlrabi Growing Tips For My Best Kohlrabi Recipe Ever" here. Of course only one of us actually qualifies as great in this case, since my kohlrabi growing attempts of late have been disasters, while Cynthia had a gorgeous winter harvest.

If you haven't yet discovered Grow Better Veggies, you're in for a real treat. Cynthia is the owner and farmer of Love Apple Farm, which is located in the Santa Cruz mountains on the central California coast and originally became known for growing 100 varieties of heirloom tomatoes each year. It is now the exclusive kitchen garden for world-renowned Manresa Restaurant in Los Gatos, California. Her Grow Better Veggies blog is "dedicated to tracking the progress of Love Apple Farm in its quest to transition to full biodynamic status, to tackle the challenges inherent in successfully providing hundreds of different kinds of edibles to Manresa Restaurant, to teach others how to grow not only the everyday popular vegetables, but also the exotic ones, and to talk a whole lot about Cynthia’s primary passion, the love apple."

If you're fortunate enough to live nearby, Cynthia gives a number of fun and informative gardening classes at the farm during the year. Love Apple Farm also offers over 100 varieties of heirloom tomato seedlings for sale at the farm in spring. Interested in some hands-on learning experience? There are volunteer opportunties at the farm as well.

Unfortunately I don't think I'll be visiting Cynthia's glorious gardens anytime soon, but I still signed up for the Love Apple Farm free e-mail newsletter. It keeps me informed about what's going on at the farm and on Grow Better Veggies, but more importantly, I get to hear about the subscribers-only contests.

Cynthia announces a new contest in each newsletter, and the current one will have 10 winners! Here's how it works:

"Anyone who leaves a nice comment on my January 24 post about kohlrabi will be entered in a raffle to win a set of 5 different and unique heirloom tomato seed packets from my friends at TomatoFest.com."

Want to win? After a short but drooling look at the TomatoFest site I know I do! Warning: they have a lot of amazing sounding heirloom tomato seeds for sale - and they're even organic. It would be really easy to go really overboard ordering seeds from this wonderful company.

To be entered in the raffle, simply subscribe to the Love Apple Farm newsletter and then leave a comment at Cynthia's kohlrabi post. There's newsletter sign-up info in the Grow Better Veggies right hand sidebar, or you can click here to go directly the mailing list sign-up page.

Whether you visit in person or in cyberspace, I think you're going to love Love Apple Farm. And who doesn't want to grow better veggies? Now if only Cynthia would send me some of that beautiful kohlrabi.

© 2008 FarmgirlFare.com, the award-winning blog where there can never be too many vine-ripened heirloom tomatoes in the kitchen garden.

Thursday, January 24, 2008

Let's Trade: Your Purple Kohlrabi Growing Tips For My Best Kohlrabi Recipe Ever


Pathetic purple kohlrabi direct seeded sometime last summer


Realization Of The Day:
I'm giving up on the kohlrabi - again. (But I'll still eat the leaves.)


There's nothing like a couple of zero degree mornings to put things into perspective. It's time to let last year's garden go. This is actually a relief because there comes a point, usually around mid-December, when covering and uncovering half a dozen raised beds with floating row covers, old bedsheets, raggedy quilts, sheets of thick clear plastic, tarps, and whatever else is cheap and handy starts to feel like a real pain in the butt—especially when you uncover the tiny Swiss chard plants you've been coddling along for months in one of the mini greenhouse beds only to find that they've been munched down to nothing but pathetic little stems by. . . well, I have no idea what ate them, only that they had to have been really persistent (and really hungry) to reach them.


As for this row of kohlrabi plants I direct seeded sometime around last June, it's actually doing pretty well considering it's been covered with nothing but two floating row covers and an old sheet during these record-breaking bitter cold temperatures, more of which are expected tonight. Kohlrabi is one cold-hardy little vegetable, but my problem seems to with the other end of the thermometer. Once again the plants have refused to form bulbs, and I think it may have to do with the heat.


Early last spring (unfortunately I didn't write down exactly when) I direct seeded a couple of rows of purple kohlrabi, and only a few of the plants ever formed bulbs. They didn't get too cold, were planted in rich organic soil, had plenty of sunshine, were watered regularly, and weren't overcrowded. But they just kept growing straight up instead of out.


Not a single one of the plants in my second planting (again I forgot to make a note of exactly when I started the seeds, but I think it was June) formed bulbs, and I made sure they were thinned out so that none of the plants were even touching each other just in case that was the problem, though I didn't think it was.


Apparently most gardeners don't have any trouble growing kohlrabi, because my search through books, blogs, seed catalogs, gardening forums, and various other online sources for help about my no-bulb problem came up with zilch.


Everybody did say that kohlrabi matures quickly, likes cool weather, should be grown in the spring and/or fall, tastes even better after a frost, and is extremely easy to grow. For them, maybe.


I did find an excellent online article about growing kohlrabi from Mother Earth News called "Cool Kohlrabi" that said if you let the bulbs form during warm weather they can become woody. I also read somewhere that if you let the bulbs get too large they can become woody, but nobody mentions what you're doing wrong if the bulbs don't form at all.


It's iffy growing spring and fall crops in Missouri, which is why I almost never get any decent broccoli. Or cabbage. Or spinach. Or rapini. Or cauliflower, which I fortunately quit trying to grow years ago because I recently learned that it is incredibly finicky.


Our winters are harsh (relatively speaking), spring heats up very quickly (we almost always have April days in the 90s), and by the time the ridiculously hot and humid summers have cooled down enough to start seeds for fall, it's well into September, and there isn't usually enough growing time left before winter really sets in.


That's what happened this year with a lot of my fall plantings. I direct seeded all sorts of things on September 15th, and while I did enjoy some gorgeous spinach, a fine crop of kale, a few Oriental greens, and even a double cutting of mizuna, the turnips, five kinds of beets, and several varieties of Swiss chard I had high hopes for unfortunately never amounted to anything. (The chard I definitely should have started earlier, as it is extremely heat tolerant.)


On the other hand, the four types of bush beans I planted in late March (and was so happy I was getting them in the ground early!) froze to death.


This is just wrong—and depressing.


I'm not giving up on my purple kohlrabi, though. I love it way too much. In fact, I probably love it even more because I hardly ever get to eat it.


Kohlrabi, from the German words kohl (cabbage) and rabi (turnip), is not actually a cabbage or a turnip. Cultivated in Europe since at least the mid 1500's, this cold loving member of the brassica (cabbage) family is low in calories, high in fiber, and a good source of several vitamins and minerals. Although kohlrabi has been grown the U.S. since at least the early 1800's, it still has yet to become very popular.


Sweet and mildly flavored, kohlrabi can be braised, boiled, stuffed, sliced, scalloped, steamed, julienned, roasted, and sautéed. You can grate it into slaw, toss it into salads, slip it into soups and stews, snack on it raw with dip, and stir-fry it. You can even wrap it in foil and grill it.


I've seen recipes where kohlrabi was covered in cream, sautéed with anchovies, stuffed into empanadas, fried into cakes, served with hollandaise sauce, and turned into a cinnamon brunch bake. This vegetable is versatile.


Unfortunately all of these cooks are wasting their time - and their kohlrabi. For the only thing you should ever be doing with kohlrabi is turning it into purée. Trust me. You'll find my favorite recipe in this post on Farmgirl Fare, What To Do With Kohlrabi? Purée it! What's really nice about this recipe (besides the fact that it tastes divine) is that it makes use of both the kohlrabi leaves and the bulbs. By the way, the cute little baby leaves make wonderful additions to salads.


Now that's kohlrabi! (This photo was taken in my kitchen garden on 7/16/07, so I know I can really do it - or it can really do it.)


Okay, so now that you have my recipe, I'm hoping you'll give me some kohlrabi growing tips. What do you think I'm doing wrong? I know kohlrabi can be successfully grown here, as I've had bumper crops in the (very distant) past, and even last spring's planting gave me enough harvestable plants, like the beautiful one above (which I supposedly let get too large but didn't taste woody at all), to make one batch of perfect purée. Any help is greatly appreciated!


In the meantime, I'm tempted to start some kohlrabi seeds in the greenhouse right now, but even in winter it can quickly shoot up to 90+ degrees in there on a sunny day, and if the heat actually is my problem I'd be wasting my time.


Instead I think I'll start a few containers of seeds indoors (which is how I used to start almost everything, but I've been direct seeding more and more as the years go by) then set out the seedlings as soon as they're a couple inches high since I know they can handle the cold.


Wish me luck. I'm really hoping that 2008 will be The Year Of The Humongous Kohlrabi Harvest. I know that someday I'll have so much kohlrabi I'll actually get tired of devouring it puréed, so I'd love to know your favorite ways to eat it, too.


Never give up for good in the garden.


© FarmgirlFare.com, the purple passioned foodie farm blog where Farmgirl Susan shares stories & photos of her crazy country life on 240 remote Missouri acres.

Tuesday, January 01, 2008

What's Growin' On 1/1/08: Happy New Year!


Moth & Zinnia, September 2007

Realization Of The Day:
All flowers look perfect to pollinators.

May you always find perfection in the garden.

It's a whole new year out there, and I'm looking forward to sharing it with you!

© Copyright 2008 FarmgirlFare.com.

Monday, November 26, 2007

What's Growin' On 11/26/07:
The Mailbox Says It's Spring Planning Season!


Tempting, Oh So Tempting. . .

Realization Of The Day:
The seed catalogs are already piling up!

Last Thursday I, along with zillions of other Americans, consciously thought about the many things I'm thankful for. When it comes to the garden, I am of course thankful for the glorious, year-round bounty my endless toiling it provides me: all the amazingly flavorful (and beautiful!) lettuce and spinach and peppers and tomatoes and potatoes and turnips and cucumbers and beans and greens and beets and kale and Swiss chard and arugula and garlic and herbs and flowers and especially the broccoli that I only very rarely manage to successfully grow.

But I'm even more thankful for something else from the garden, and it isn't even edible: it's the annual ability to completely forget every single disaster and disappointment of the year and start excitedly planning next spring's garden before winter has even begun.

The seed companies know all too well that we gardeners come down with this strange, yet oh-so-convenient affliction. In fact they bank on it. Yes, just moments after the most pitiful tomato harvest in a decade has faded to a hazy memory, the seed catalogs quietly begin to arrive. Next year will be different, we tell ourselves as we begin casually flipping through the first one, eyes glazing over, brain whirring a million miles an hour as we mentally (and effortlessly!) expand the garden to ten times its current size and fill non-existent pantry shelves with 3,000 jars of neatly preserved bounty.

Next year there will be no squash bugs! Next year the blister beetles will spend the summer somewhere else! Next year there will be more tomatoes than I know what to do with! Next year it will be 62 degrees and partly cloudy for 199 days in a row! Next year absolutely everything in the garden will be picture perfect!

Oh, how happy the seed companies will be when they see our largest, most ambitious orders yet!

We can't help it. And really, why should we? For just a few dollars (okay, for some of us it's more than just a few), our seed orders buy us endless winter hours spent happily planting and plotting and harvesting more than we could ever possibly eat. In our dream gardens there exists nothing but pure, unbugbitten success. Sometimes I think December and January are actually the most productive months in my garden.

You may have noticed that these are 2007 seed catalogs in the photo. That's because I'd planned to write this post a year ago. I guess I got carried away drooling over poring through them all instead. I was so proud of myself when I faxed in a seed order on New Year's Eve--the earliest I'd ever placed one. I figured it was a sign of things to come--this would be the year I did everything on time, or even early! Instead I found myself frantically behind in more ways than I ever thought possible from January through September, even for me. I actually bought tomato plants.

But that's all over now. And there's nothing but a whole new gardening year ahead.

There are certain varieties of seeds I faithfully order year in and year out, and of course I save lots of my own seeds, too. But I always like to grow a certain number of new things each year as well. I'm especially drawn to old and rare heirlooms, which my beloved Baker Creek Heirloom Seeds here in Missouri specializes in. Their 2008 catalog hasn't arrived yet, but the one from my other tried and true supplier, Pinetree Garden Seeds in Maine, has.

A brief look through it already has me eyeing some new offerings, including Cosmonaut Volkov tomatoes ("It's like one of those urban legends--we've been hearing about it for years. . . attractive, crack resistant, uniform fruit provide just the right balance of both sweet and tart flavors."), Midnight Ruffles lettuce ("This new variety from an Oregon breeder is the darkest red lettuce we've seen, almost black in color."), and Welsh onions ("This perennial is used like chives but the flavor is substantially stronger.")

I hope to write about some of my favorite varieties of veggies in the upcoming weeks, along with some of the ones that won't be making second appearances in my garden. In the meantime, what are your favorites and--perhaps more importantly--your least favorites? Or are you buried under a pile of seed catalogs?

Copyright © 2007 FarmgirlFare.com, the award-winning blog where Farmgirl Susan shares stories & photos of her crazy country life on 240 remote acres.

Sunday, October 28, 2007

What's Growin' On 10/28/07: First Frost! Plus Growing Strawberries How To Prepare Your Strawberry Bed ror Winter


Cool Cavendish Strawberry Plants

Realization Of The Day:
Even though I'm usually expecting it, the first frost of the season always comes as somewhat of a surprise.

I think it's because I get spoiled in early October. Things have cooled down (most years anyway), the majority of ravenous insects have disappeared, and autumn rainstorms mean I no longer need to don my Watering Queen hat every day. Garden duties are greatly diminished, and nothing really needs to be protected at night yet. Even the greenhouse can stay open and vented all the time.

October in the garden feels positively luxurious. Then all of a sudden the frost shows up, and I sort of start to panic.

It really isn't too much of a problem yet, though (and everything does look pretty all covered in frost), as it won't be getting this cold every night for a while. Our days should stay fairly warm, too. Next week it's even supposed to pop back up into the 70s. So at this point, protection from the occasional cold snap simply means covering the autumn crops with floating row cover, which can even be left on your plants during the day if you're feeling lazy.

All I have to remember is that this is the time of the year when we need to adjust the temperature forecasts to reflect the cooler weather down here in our little valley, technically known as a 'low lying area.' While the official report was 41° at 8:30am this morning, we were at 32°.

Meanwhile, the strawberry bed doesn't need any attention just yet. The latest issue of Progressive Farmer magazine (you never know where you'll find helpful gardening tips) offers this advice for preparing your strawberry beds for the upcoming winter:

Strawberry plants are hardy perennials, but the alternate freezing and thawing that heaves them from the ground is what you must protect against. Cover the strawberries with 4 to 6 inches of hay, which is loose enough to let them breathe. Wait until after several frosts, but not enough cold to freeze the ground. You do not need to cut the foliage back before mulching.

I've always covered my strawberry bed with a thick layer of hay each year, but I never realized it was to protect the plants from ground heaves. This is the same reason you need to cover your fall-planted garlic (which I meant to plant yesterday!).

The only problem I have is that my beagle, Robin, loves to curl up on what she has decided are hay beds built especially for her. At almost 11 years old, though, she is semi-retired and will probably be spending much of her days and nights curled up next to the living room woodstove this winter instead (where she is right now, in a plush round cat bed that is much too small for her but that she insists on squeezing into anyway).

I created a new 4' x 8' strawberry bed this year, which I filled on May 7th with 30 Cavendish plants I ordered for $9.95 from my beloved Pinetree Garden Seeds. According to their catalog, this midseason variety offers "high yields of large berries with excellent flavor that make this a good choice for home gardens or roadside stands. High resistance to red stele and intermediate resistance to verticillium wilt. Berries ripen over a long season."

So far the plants are doing great, despite having nearly the entire bed eaten down to almost nothing twice over the summer by deer. Covering it with old sheets at night helped with that problem.

As difficult as it always is, especially since my old strawberry bed was history this year, I pinched off all the blooms so the plants could focus their energy on building up a strong root system rather than producing berries. For a while I pinched all the runners off, too, but if your plants are as vigorous as these were, this is a job that can easily away from you.

At one point I left the runners that had already rooted themselves into the ground, but snipped the connecting stem from each mother plant. Basically I filled in the empty spaces for free. Then after the deer damage I just left the entire bed alone as I wasn't even sure if it would survive. But the plants came back with a vengeance and the entire bed is now completely filled in.

I already have high hopes for a bumper strawberry crop next spring. While others are busy conjuring up visions of sugarplums during the upcoming holiday season, I'll be dreaming of bowls and bowls of those sweet, jewel-like berries—and there won't be a single turtle in sight!

Other Strawberry Growing Posts:
6/5/05: Strawberries from Garden to Kitchen
5/21/06: A Beautiful Breakfast!
5/27/06: Cary, Bear, and Me vs. The Turtles
5/28/08: Successfully Growing Strawberries
7/20/08: Strawberries in the Garden & an Orange Yogurt Cake Recipe in the Kitchen
9/7/09: How To Grow Bigger Strawberries Next Year

© 2007 FarmgirlFare.com, the crisp and cool foodie farm blog where there never seem to be enough strawberries.

Friday, October 12, 2007

What To Do With Swiss Chard: Hot Swiss Chard Artichoke Dip Recipe and Other Ways To Cook and Enjoy My Favorite Leafy Green

Chard art

November 2011 update: I share a great new way we enjoy Swiss chard in Wondering What To Do with Swiss Chard? Favorite Recipes and Ways to Use My Favorite Garden Vegetable. Hint: we love our powerful little $50 Waring juicer!

The best Swiss chard you'll ever eat is that which you grow yourself. Find out how easy it is in my post, How To Grow Your Own Swiss Chard from Seed & Why You Should.

While there are endless things you can do in the kitchen with Swiss chard, I have to admit that every year the vast majority of what I grow gets harvested very young and tossed straight into the salad bowl. But of course I eat a lot more salad than normal people.

The flavorful baby leaves are a wonderful stand-in for spinach and can be happily combined with just about any other salad green you can think of.

When I'm lucky, I have more Swiss chard in the garden than even I can eat in salad form. This happened early last spring when two dozen overwintered plants in the greenhouse came back to life with a vengeance.

One of the things I love about Swiss chard is how amazingly big the leaves can get, but when I step inside the greenhouse and feel as if I've suddenly been transported to Jurassic Park, it starts to get a little scary. That's when it's time to whack them down and hit them with some heat, because even the most enormous leaves will shrink down to practically nothing if you cook them.

It never ceases to amaze me that a bowl of bounty nearly too big to get through the door will fit inside a teacup once you cook it. The concentrated amount of nutrients that must be contained in that teacup is mind-boggling.

You'll find bunches of Swiss chard in supermarkets year-round, but freshness and quality can vary greatly. Peak season in most areas is from June through October, though in milder climates you often can find interesting varieties of just-harvested bounty at farmers' markets from early spring until late fall or even early winter. Look for crisp stalks with shiny, unblemished leaves.


Canary Yellow Swiss Chard in the homemade greenhouse last October

Wondering what to do with your Swiss chard? You can't go wrong if you sauté it with chopped fresh garlic in some nice olive oil. And by all means, don't forget the stalks. I chop them up and cook them in the oil until they're soft, then add the coarsely chopped leaves, covering the pan for the first minute or two.

You can add a smidgen of anchovy paste to the oil to coax out flavor (it won't add a fishy taste). Throw in a handful of chopped pancetta or proscuitto, and you'll probably receive a round of applause. A sprinkling of freshly grated Pecorino Romano might be considered over the top, but only by people who haven't yet tried it.

You can use Swiss chard (and many other greens) in place of spinach in virtually any recipe. Try it in lasagna, ravioli and quiche — or even your favorite stuffing. Toss it with pasta or add thin strips to stir-fried rice during the last few minutes of cooking.

Mix chopped fresh chard or kale into pizza sauce or scatter over homemade pizza before adding the cheese. Stir sliced leaves into soups, and slip steamed greens into scrambled eggs, omelets and frittatas. You can even steam Swiss chard stalks and eat them like asparagus.

Need more inspiration? You'll find all sorts of other scrumptious ideas in the comments section of this post. Many thanks to all the In My Kitchen Garden readers who responded to my request to share their favorite ways to eat Swiss chard. And you'll find links to more of my Swiss chard recipes at the bottom of this post.

Do you have a favorite Swiss chard recipe you'd like to share?


One of my favorite ways to enjoy Swiss chard is in this dip I created last spring. This addictive stuff goes well with practically anything: crackers, tortilla chips, toasted or untoasted sourdough baguette slices, fresh veggies, pita chips, even pretzels.

Don't be afraid to think beyond the dip bowl, either—try putting it on baked potatoes or using it in an omelet. I even like it cold.

Farmgirl Susan's Hot Swiss Chard Artichoke Dip Recipe
Makes about 3 cups

My version of the popular spinach artichoke dip is cooked on the stovetop instead of in the oven and uses chopped fresh Swiss chard leaves and stalks in place of frozen spinach, along with plenty of onion and garlic for extra flavor.

It tastes even better if you make it a day ahead and reheat it just before serving, either in the microwave or on the stovetop (you might need to add a splash of milk when reheating on the stove). You can use reduced-fat cream cheese and mayonnaise, as well as low-fat sour cream, if desired.

When I was creating the recipe, I used red Swiss chard for the initial batch, thinking the chopped stems would add nice bits of color. Instead I ended up with pink dip. It tasted great but looked like salmon spread, which might be confusing to eaters. If you're making it for yourself, go ahead and use whatever color chard you like.

1/4 cup olive oil
1 cup finely chopped onion (about 5 ounces)
4 to 6 cloves garlic, minced
1 bunch Swiss chard (about 12 ounces), leaves and stalks separated and both chopped into small pieces
1 14-ounce can artichoke hearts (packed in water), drained and rinsed, chopped into small pieces
4 ounces cream cheese (half of an 8-ounce package), softened
1/2 cup sour cream
1/4 cup mayonnaise
1½ cups finely grated Pecorino Romano (or parmesan) cheese (about 4 ounces)
2 teaspoons Worcestershire sauce
Salt and pepper to taste
Chopped scallions or chives for garnish (optional)

Heat the olive oil in a large pot. Add onion and chopped Swiss chard stalks and cook, stirring frequently, until soft, about 5 to 7 minutes. Add garlic and cook, stirring frequently, 2 minutes; do not let garlic brown.

Stir Swiss chard leaves and chopped artichoke hearts into onion mixture. Cover and cook, stirring occasionally, until chard is tender, about 5 minutes. (Remove lid for last few minutes of cooking if there is liquid in the pot.)

Stir cream cheese, sour cream, mayonnaise, Romano cheese and Worcestershire sauce into Swiss chard mixture and cook 10 to 15 minutes, stirring occasionally, until dip is hot and thick. Add salt and pepper to taste.

Serve warm, garnished with plenty of chopped scallions or chives, if desired.

Still have some Swiss chard left? You might enjoy these recipes:
Healthy Swiss Chard Tuna Salad with Scallions & Kalamata Olives
Swiss Chard Cabbage Salad with Garbanzo Beans & Cottage Cheese
Swiss Chard & Artichoke Soup

Swiss Chard & Artichoke 'White' Pizza

Can't survive on leafy greens alone? You'll find links to all my sweet and savory Less Fuss, More Flavor recipes in the Farmgirl Fare Recipe Index.

© FarmgirlFare.com, the chard crazy foodie farm blog where Farmgirl Susan shares stories & photos of her crazy country life on 240 remote Missouri acres.

Tuesday, October 02, 2007

What's Growin' On 10/2/07: Blink And It's Gone


Golden Globe Turnip & Blue Curled Scotch Kale Seedlings

Realization Of The Day:
It's October.

It's October?! What the heck happened to September?

While there isn't often a whole lot of excitement in the garden in October (unless you count my jumping for joy that the majority of damaging insects have finally disappeared), it's my favorite month on the farm. Autumn doesn't last long in southern Missouri, but when it's here it's very comfortable and very beautiful. In a good year, the colors of the turning leaves rival those in New England. No, really.

The doors and windows of The Shack still stand wide open, and it cools down pleasantly at night, though not enough to warrant having to start up the woodstove yet. That means we aren't hauling firewood into the living room half a dozen times a day, although we do need to start cutting some. This year's woodpile (which is our main source of heat throughout winter) is pretty much non-existent. Okay, there's no pretty much about it, it's non-existent. Months of sweltering heat and humidity make it incredibly easy to ignore that fact--every single year.

Since I haven't been busy dealing with firewood, I did have a chance to plant some fall crops. The seedlings you see above were direct seeded on September 15th, and I guess I was a little heavy handed with the sprinkling. They're in dire need of thinning, but too much germination is always better than not enough. And the cute baby sprouts will be tasty and nutritious additions to the salad bowl.

I planted these seeds in the taller of the two mini greenhouse beds, so once it starts freezing at night I'll cover the frame with thick clear plastic. (Note: there's construction information for the mini greenhouse beds in the comments section of that link. And for those of you who have been asking about what the layout of my garden looks like, you can see most of it in the photos, though it's been expanded since then.) Since I planted only crops that thrive in cool weather in there, I'm hoping to extend my harvest well into winter.

I've had pretty good luck growing turnips over the years. You can read more about my experiences here, including growing tips and how to harvest from your turnip plants all year long.

One of my favorite ways to use turnips is in Garlic Lover's White Bean Soup, a tasty, easy, and oh-so-comforting recipe. It also happens to be vegan and fat free, but you don't have to tell anybody those details unless you want to.

I started plenty of other seeds as well, including several types of Oriental greens, though not everything I'd hoped to. Five raised beds and not a single lettuce seed sown anywhere! I'm telling myself there's still time, but at the rate time has been speeding by, I'm going to blink and it'll be Christmas. Lettuce seeds started or not, I can only hope that my beloved October will stick around long enough for me to enjoy it.

© 2007 FarmgirlFare.com, the award-winning blog where Farmgirl Susan shares stories & photos of her crazy country life on 240 remote acres.

Wednesday, September 26, 2007

How To Grow Your Own Swiss Chard From Seed & Why You Should

Fordhook Giant Swiss Chard in the homemade greenhouse last November.

Looking for Swiss chard recipes? Here are some of my favorites:
What To Do With Swiss Chard—Hot Swiss Chard Artichoke Dip Recipe & Other Ways To Cook & Enjoy My Favorite Leafy Green
Healthy Swiss Chard Tuna Salad with Scallions & Kalamata Olives
Swiss Chard Cabbage Salad with Garbanzo Beans & Cottage Cheese
Swiss Chard and Artichoke Soup

Swiss Chard and Artichoke 'White' Pizza

The year I turned 30, I had two friends who turned 60, and I took full advantage of the situation. "Save me some trouble," I said, "and tell me the most valuable thing you've learned in the last 30 years."

The first one offered up a piece of advice I've tried to abide by ever since. He said, "Be happy, not resentful or envious, when good things happen to other people." But it was seven words of wisdom from the second friend that truly changed my life: "Always plant Swiss chard in the garden."

Saturday, September 22, 2007

What's Growin' On 9/22/07: Packing Back Up The Polarfleece & Putting Purple Basil To Good Use


No Worries Yet For This Cold Intolerant Purple Basil

Realization Of The Day:
Mother Nature is a tease.

Or maybe she's simply bored and figured she'd have some laughs by torturing us here in Missouri. All I know is that our recent little cold snap was a very false alarm.

Last Saturday morning it was 40 degrees. As someone who would be perfectly thrilled if the temperature never again went above 70, I celebrated by diving into a tub labled 'polarfleece,' emerging triumphantly with a cozy pullover and the lime green pajama pants decorated with sheep and stars that my mother once gave me for Christmas. (The Shack is not equipped with closets, so we live out of stacks and stacks of large plastic containers.) I flung a giant polarfleece blanket on the bed, slipped on thick fuzzy socklets, and dusted off the teakettle. While my first cup of hot tea in months sat steeping, I wondered if I had enough clear plastic sheeting to cover the several raised beds I'd just seeded with fall crops so the soil would stay warm enough for the seeds to germinate.

Then it heated back up. By mid-afternoon Sunday I'd convinced myself there was no ignoring summer's return, and that sweating to death in a cotton turtleneck out of protest wouldn't do any good. I reluctantly changed into a tank top, made some iced tea, and stuffed all the polarfleece back into their bins. Today's forecast predicted a high of 89 degrees.

The good news is that most of the seeds I planted have already sprouted. I even bothered to write down what I planted where. (I'll post a complete list in the next few days.) And, as Joe correctly pointed out, just a couple of sweltering weeks ago I would have been thrilled to hear that it was only supposed to be in the upper 80s.

As for this striking purple basil plant, it's no longer draped with a floating row cover to protect it from the cold and will probably be safe outside for at least another week or two. The green basil surrounding it was turned into my favorite pesto a few weeks ago, though I did follow my own advice and left the stripped plants in the ground. The purple basil is ready to be picked now, but, as pathetic as this sounds, I'm not sure what to do with it. I love fresh basil in all kinds of dishes, and I love the color of these leaves, especially how they're outlined in green, but the thought of blackish purple basil pesto--or blackish purple basil anything for that matter--just doesn't seem appealing.

A friend suggested I make basil vinegar with it. You fill a large jar with half white vinegar, half cider vinegar, then stuff it with purple basil and let it steep for a week. Strain it and pour the resulting gorgeous magenta vinegar into a pretty bottle with a few sprigs of fresh basil. That sounds nice, but I'm not sure what I'd do with it. I'm really not very creative when it comes to using herbs in the kitchen. I also never use white vinegar, preferring white balsamic instead, which I suppose would work, too. It would certainly be nice to look at sitting on a kitchen shelf, but she says you need to store the vinegar in a dark place in order for it to retain its color.

So help me out here. If you had a beautiul purple basil plant in your garden, or a bottle of magenta basil vinegar in your pantry, what would you do with them?

© 2007 FarmgirlFare.com, the award-winning blog where Farmgirl Susan shares stories & photos of her crazy country life on 240 remote Missouri acres.

Sunday, September 16, 2007

Another Less Fuss, More Flavor Recipe: The Easiest Greek Salad Ever


This beautiful summer salad is so full of flavor it doesn't even need dressing.


The way I cooked, ate, bought, and even thought about food all changed dramatically when I left urban Northern California for rural Missouri 13 years ago. Most of this was a direct result of space and availability. Moving from a 900 square-foot cottage with a postage-stamp sized yard to a couple of hundred acres meant there was space for a large kitchen garden, space for chest freezers, space for animals to graze.

Availability was a different story. Relocating from one of the undisputed gastronomic capitals of the world to the middle of nowhere in middle America meant that a lot of food purchasing options disappeared. Order Chinese take-out or have a pizza delivered? Neither. Dash to the store for proscuitto, kohlrabi, sherry wine vinegar? Forget it. Buying parsley or cilantro means 80 miles of driving. One learns to adapt.

My food philosophy these days can pretty much be summed up by the phrase Less Fuss, More Flavor. And what that simply means is this: the better your ingredients, the less you have to mess with them.

Of course some might argue that growing two dozen types of salad greens or putting up 100 pounds of tomatoes or raising your own lamb and beef constitutes a fair amount of fuss. But the nice thing is that if you start with the best, then at the end of the day when you're tired and sore and starving to death, a meal fit for even the most gourmet gourmand can be ready in a snap.

A typical late summer dinner for us might include grilled lamb chops or lamb leg steaks (I love these!), the last of the French filet beans in the garden, and some freshly dug Yukon Gold potatoes (because the best way to store your potatoes is to leave them in the ground). Now sure, you could marinate the lamb for hours with garlic and fresh herbs and all sorts of other delightful stuff, make the delicious sounding but 4-step Warm Green Bean, Pancetta & Tomato Salad with Parmesan in the issue of Fine Cooking I had sitting on the kitchen counter for months (but never actually made), and turn the potatoes into some gorgeous, creamy gratin. But the point is, you don't have to.

More often than not, the lamb gets tossed straight onto the grill, and the beans and potatoes are cooked up (steamed just until tender and boiled, respectively) and served with nothing more than a little organic butter and some nice salt and pepper. Less Fuss, More Flavor allows you to be lazy in the kitchen—without anyone ever realizing it.

A crusty loaf of homemade crusty bread (I always bake three or four loaves at a time and freeze them) and an heirloom tomato salad round things out. Except for a platter of plain sliced tomatoes, which often appears at our table, you can't get much simpler than this bare bones Greek style salad.

So what's your favorite Less Fuss, More Flavor recipe?

Farmgirl Susan's Simplest Greek Salad
Serves at least one

This pared-down version contains just five ingredients, so using the finest of each is of utmost importance. Juicy, vine-ripened tomatoes are the key, which means this is a Summer Only recipe. Stuff yourself silly on it now, and let the memories keep you satiated through the rest of the year.


Most Greek salads call for various other ingredients, some traditional and some not. Everybody seems to have their own favorite version. I used to add olive oil and vinegar but don't bother anymore. I've listed several optional additions below, though none are necessary. I didn't even put salt & pepper in the batch pictured here, though I did add a large handful of chopped flat-leaf parsley.

If you're a nibbler like me, bear in mind that the more complicated the recipe gets, the longer you'll have to fill yourself up while putting it together. Many Greek salad recipes call for cutting the vegetables into large pieces, but I like them on the small side because I'm one of those people who wants a taste of every thing in every bite.

Garbanzo beans (chickpeas) aren't traditional, but I'm addicted to them and will toss them into practically anything when I'm not snacking on them straight from the can (I do rinse them first). Flavorwise, they fit right in here, and they give the salad a fiber and protein boost as well, which can be important if this ends up being your entire meal, like it was for me tonight.

Organic garbanzo beans are a bargain and should be a staple in everyone's pantry. You can find them in many places for under a dollar a can, including at Whole Foods Market, where they'll give you an extra discount if you stock up and buy a dozen cans at a time.


One large cucumber, cut into dice
Several vine-ripened tomatoes, preferably freshly picked, organically grown heirlooms (a variety of colors is nice), cut into small chunks
A handful of kalamata olives, pitted and coarsely chopped
A generous handful of fresh basil, chopped
A hunk of the nicest feta cheese you can find, preferably made from sheep's milk
Splash of brine from the olives or feta

Optional additions:
Garbanzo beans (chickpeas)
Salt & pepper to taste
Olive oil
Your favorite vinegar
Fresh lemon juice
Fresh garlic
Fresh oregano
Flat-leaf parsley
Anchovies, laid on top or a smidge of anchovy paste mixed in
Capers
Red onion
Sweet red peppers
Green bell peppers

Place cucumber, tomatoes, olives, basil, and half the feta cheese (crumbled) in a large bowl along with any desired additional ingredients. Gently toss with a large spoon until combined. Sprinkle with remaining feta cheese just before serving. Alternatively, you can whisk together an olive-oil based dressing and then toss it with the rest of the ingredients.

This salad tastes best if you mix it up and then let it sit for an hour or two at room temperature so the flavors can mingle, but it's delicious even in the making, which is of course how I always eat it.

Tomatoes lose their flavor when refrigerated, so don't make enough for leftovers—just mix up another batch.

Still have more tomatoes left? You'll find links to all my Less Fuss, More Flavor tomato recipes at the end of this post.

© FarmgirlFare.com, the freshly picked foodie farm blog where Farmgirl Susan shares recipes, stories, & photos of her crazy country life on 240 remote Missouri acres—and we never get tired of tomatoes, though each summer we try our very best.