Friday, March 31, 2006

After The Storm


Yesterday's weather was just plain weird. Unseasonably hot (upper 70s), so windy that at one point I caught myself staring up at the hillside of leafleses trees above the barn, wondering how it could sound like a gigantic waterfall. Stormclouds blew across the sky at record speeds. A few of them finally slowed down in the middle of the night--long enough to drop a fair amount of rain on the farm, waking me with the comforting sound of raindrops splattering onto our old tin roof.

This morning the sunshine is brighter than bright, all of the new spring green is thirstily slurping up the much needed moisture, and the birds are on full-blown chirp. It's one of those days where you know that if you just slow down for a minute, you'll actually be able to see the grass grow. But with onion sets to plant, a newborn baby in the barn, and a laundry line just crying out to be filled with crisp, clean sheets billowing in the breeze, who has time to slow down?

Thursday, March 30, 2006

Book Recommendation: The Vegetable Gardener's Bible by Edward C. Smith


I've recommended The Vegetable Gardener's Bible more than once on Farmgirl Fare, and for good reason—it's an excellent source of information, especially if you're a beginning gardener. I recently came across a review I wrote when it was first published back in 2001. Five years later, everything still holds true—and this continues to be one of the few gardening books I find myself turning to again and again.

If you are only going to buy one edible gardening book, I encourage you to make it this one. It also makes a great gift. Need more convincing? Here's my original review:

I'm an avid gardener and confessed gardening book junkie. I never trust just one authority, preferring instead to consult several sources. But that was before I came across The Vegetable Gardener's Bible by Ed Smith. This is a book every gardener should own. It is the only publication an absolute beginner needs to start planting, while experienced growers will probably find their other gardening books gathering dust soon after buying it.

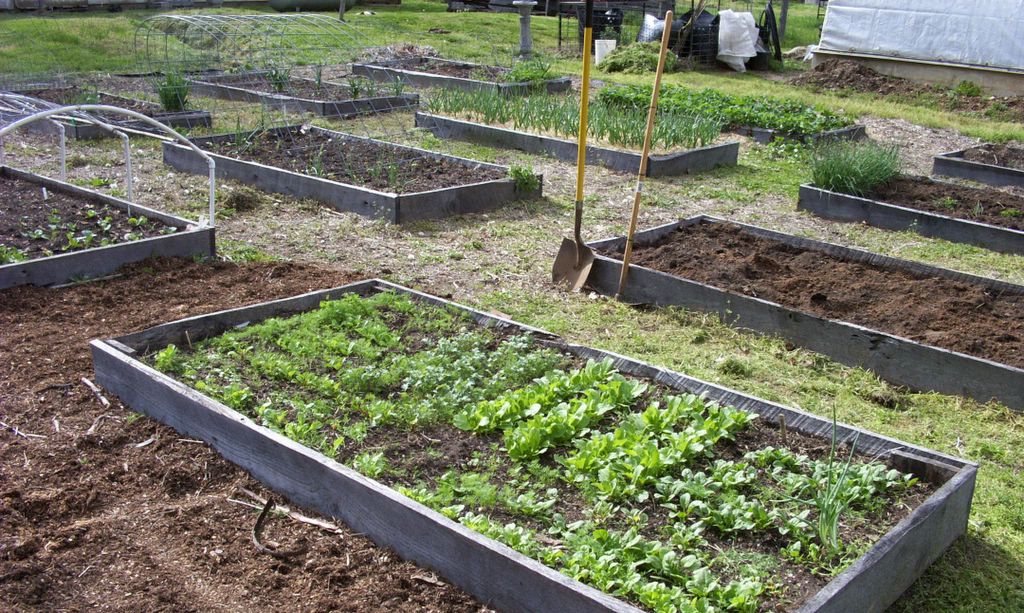
The basis of the book revolves around Ed's high yield "W-O-R-D" system: Wide rows, Organic methods, Raised beds, Deep soil. Ed, who gardens in brutal Northern Vermont, claims that anyone following his simple techniques—refined over 30 years—can grow their best gardens ever with higher yields and less work. And while his proven system (and arguments for applying it) make remarkable sense, the book goes far beyond simply describing high-intensity, natural gardening.

It's packed with practical information for gardeners of all levels, and manages to skillfully cover such wide-ranging topics as building raised beds and trellises, choosing a seed supplier, taking a soil sample, and making homemade bug spray—all in a highly approachable manner that is interesting and fun to read.

The book is divided into three parts. Part 1, From Seed To Harvest, explains Ed's W-O-R-D methods and shows you how to implement them. Part 2, The Healthy Garden, takes an in-depth look at soil, composting, and natural pest controls. Part 3, Vegetables & Herbs A-Z, is the most useful plant directory I have come across.

Along with detailed sections for each plant on sowing and growing, harvesting and storing, and the best varieties, there are helpful tips and a quick-reference "sow and grow" sidebox that lists everything from sowing dates and nutrient requirements to good and bad companions, rotation considerations, and seed longevity.

The text is supplemented with 550 color photos and several handy charts and lists. The sidebars of practical tidbits alone—how to sharpen a garden hoe, how to make your own non-toxic wood preservative—are worth the price of the book. The numerous ingenious—and seemingly obvious—ideas had me constantly saying, "Of course!"

And yet I'd never thought to weed around fragile seedlings with scissors. Or to put rampantly spreading mint plants in containers and then simply tuck the containers among my cabbages to deter cabbage moths. Or to lay out new garden beds with a sprinkling flour rather than lime, which I never have around. In fact, it was all I could do to keep reading; after every few pages I wanted to dash out to the garden and try another of Ed's suggestions.

Bound to become a perennial favorite, the word on The Vegetable Gardener's Bible is a resounding yes!

© FarmgirlFare.com

Tuesday, March 28, 2006

Coming Up


Volunteer Arugula In The Greenhouse

Thanks to all of you for the enthusiastic response to my new baby blog--it's really inspiring. This is just a quick note to tell you about a few things I plan to write about here soon. Some of them are in response to your comments and questions, some are pretty much just for my benefit, and some will hopefully be helpful to those of you with gardens of your own. All of them should make this a more well rounded, interesting site:

--The one gardening tool I absolutely cannot live without (and it's only $12.98)
--My very favorite edible gardening book
--More about minding the moonsigns (and a list each month of the "good" planting days)
--A bit about raised beds (including why I love mine so much)
--Growing greens: lettuce & beyond
--A new feature called From Garden To Table (a record of what I eat when from the garden). Six things went into Sunday's salad--not bad for the end of March in Zone 5!

I've also been snapping lots of photos, like the one above taken yesterday. I'm really looking forward to having an ongoing, detailed visual record of what's going on in the garden for the first time.

In the meantime, if you're interested in starting seeds, there is quite a bit of handy information in the comments section of this Farmgirl Fare post. And if you have a gardening pal who might enjoy this blog, I hope you'll spread the word. Thanks so much. Wishing you good growing.

Sunday, March 26, 2006

It's Time To Plant Onions!


Red, white and yellow onion sets

Well, almost time at least. I'm giving you a little advanced warning. If you garden by the moon signs (I figure I need all the help I can get), then you'll want to plant your onions on a fertile day in the first quarter.* During this moon cycle, they are Friday, March 31st and Saturday, April 1st. After that, the next fertile first quarter days aren't until April 28th, 29th, and May 2nd, 3rd, and 4th--which is getting a bit late for starting onions.

As you can see, I'm all set to go with my three varieties of onion sets. As long as your ground isn't still frozen, you can safely start your onions anytime now, but you really should do it on Friday or Saturday. They're very hardy and once sprouted will survive even hard frosts (we're still having morning temperatures in the low 20s) with no problems. Onions are a wonderful addition to any garden, and they can be popped into even the smallest spaces.

So why do I buy onion sets rather than starting them from seed (like everything else in my garden)? The answer to this question is in one of the first articles I posted on Farmgirl Fare back in June of 2005, "Onions In The Garden," which also includes photos, planting instructions, and some newly added growing tips. Just click here to read it.

*Seeds to start on fertile first quarter days include: flowers, lettuce, all other leafy greens, cruciferous vegetables such as broccoli and cabbage, cucumbers, beans, and peas. (Pretty much anything except members of the tomato/squash/pepper family--which you want to start on fertile days in the second quarter).

Wednesday, March 22, 2006

What's Growin' On: 3/22/06

22 Degrees F At 7:00am


Garlic Is Hardy, It Should Recover Just Fine


And Kohlrabi's Hardy, Too, Right?

Note to self: Just because the calendar says 'spring,' doesn't mean you should blow off covering up newly sprouted plants in the garden.

Monday, March 20, 2006

Past Inspiration


Looking Toward The Hayfield 4/20/03


Garden & Greenhouse 4/20/03


Spring Greens 4/20/03

What's Growin' On: 3/19/06


My Favorite Kind Of Flower--No Maintenance!

March 17th, 18th, and 19th were all fertile days in the third quarter, so I was busy planting and transplanting. Fortunately the weather cooperated most of the time.

Planted one raised bed of potatoes (leftovers from last year, mostly Russets, few Yukon Golds, didn't bother to cut them up, just planted whole). Put them in a bed that had lots of mucked out barn hay put in it several months ago. Soil looks great. Potatoes should love it.

Transplanted about a dozen plugs of lettuce seedlings into the edge of the bed where I'd directed seeded several varieties of lettuce (they sprouted well and are looking good): one green variety--lost tag--and a few Dark Lolla Rossa, very small. This was an experiment: first time I'd sowed the seeds in individual plugs instead of in little containers and then moved them into the plugs. Should have thinned out the plugs to one or two plants in each (duh); had great germination rates and ended up with about 10 tiny plants in each little plug. A real mess trying to transplant the tender seedlings into the garden. I just planted the entire clumps. We'll see what happens.

Transplanted pepper seedlings started on 2/6/06 into individual containers:
--Orange Bell (my 2005 seeds)
--My favorite huge sweet red pepper Aconcagua (my 2005 seeds)

Transplanted tomato seedlings started on 2/6/06 into individual containers:
--Thai Pink Egg, incredibly prolific last year (mine 2005)
--Kellogg's Breakfast giant orange tomatoes (Baker Creek 2005 seeds)
--Arkansas Traveler, medium sized pink (BC 2003 seeds)
--English Moneymaker, good in greenhouses (BC 2003 seeds)
--Yellow Plum (mine 2005)
--San Marzano Paste (mine 2005)
--Orange Banana, so sweet last year (mine 2005)
--VFN, standard red heirloom, disease resistant variety (my seeds--old)
--My Secret New Hybrid (2005 seeds)

Note: All seedlings (before transplanting) had major growth spurts when I started watering them with llama manure tea.

Miscellaneous:
--Direct seeded lettuces had great germination rate. Have them in mini greenhouse plot, just covered with an old sheet (Joe calls it the covered wagon plot) . Have removed all other sheets and blankets from plots as we have had milder temps and rain. 20s predicted this week, though, so may need to re-cover turnips, Spanish black radish, pathetic looking chard plants (something has been eating them!), and strawberries.

--Purple kohlrabi seeds came up like crazy, but the cold season greens in that plot have yet to sprout (mache, Bloomsdale Longstanding spinach, New Zealand spinach). Why do I still insist upon trying to grow spinach? Why? (Note to self: remember the definition of insanity--doing the same thing over and over and expecting different results.)

--Daffodils blooming all around the yard. So pretty. I think of them as the color 'cheerful.'

--Lilacs are budding. Tiny sucker plants I put into little pots 5 years ago and never got around to transplanting are now about four feet high, growing straight through their pots into the ground, and no doubt cannot be moved from their odd location in the midst of the compost bins. They even have tiny flowers on them this year! Oh well, I'll take lilacs anywhere I can get them. Must really think about trying to move them, though. But to where?

--Volunteer arugula (rocket) coming up like crazy in greenhouse since I thought to water the entire bed. Yay! Chard and beets survived winter and are starting to grow again. So dark green and purple. They loved the llama pellets I scattered all over the bed.

Looking Back: Building a Simple, Inexpensive, Homemade Greenhouse

August 2002: We had a cement footer poured, then built short cinderblock walls. The interior of the greenhouse is 7½ feet wide by 21 feet long.

The wire frame is made from five 16 foot x 52 inch cattle panels (which have countless uses and are available at farm stores) that are fastened together with tie wire. The ceiling is about 8 feet high in the center.


The finished greenhouse in April 2003


The greenhouse interior in April 2003

The greenhouse interior in May 2003

There's more information about constructing the greenhouse in the comments section of this post.

Sunday, March 19, 2006

Greenhouse Within A Greenhouse

When Spring And Snow Are Both Predicted


Yesterday's Quick Thinking Handiwork


My Heirloom Tomato & Pepper Seedlings Are Safe & Warm

Our weather is anything but predictable. Spring may officially start tomorrow, but sleet and snow and freezing temperatures are also in the forecast. So after transplanting about 150 tender tomato and pepper seedlings into individual containers yesterday, and then realizing there was no way they would all fit under my one four-foot flourescent plant light in the house, we created a temporary mini greenhouse inside my 8-foot by 22-foot homemade greenhouse. (Click here for a peek at my potting bench and tips on starting your own seeds.)

A two-tiered plant stand was simply covered with thick plastic and clamped to the sides of the structure. There are cardboard "walls" on the left and right, and a large piece of cardboard under the bottom shelf (not visible in the photo). Also tucked under the bottom shelf is a radiator type space heater set on low (600 watts). These are very safe, fairly inexpensive to run, and even have an automatic thermostat so I can just leave it on all the time.

Today is cold and cloudy so I am keeping the mini greenhouse closed up, but when the sun pokes out, I will simply roll up the plastic during the day and roll it back down at night.

This was a spur of the moment, makeshift effort, completely created from materials we already had laying around. I call it Gardening On The Cheap. It may not be beautiful, but it does the job. I do not have a Glamour Garden. The only things I'm really concerned with are the finished products. I can practically taste those luscious, vine-ripened tomatoes now.

Note: This is my entry for Weekend Herb Blogging #24, a deliciously informative event hosted by Kalyn's Kitchen. Food bloggers from around the world participate, and you never know what interesting new edibles you'll discover each week in the Sunday night roundup.