
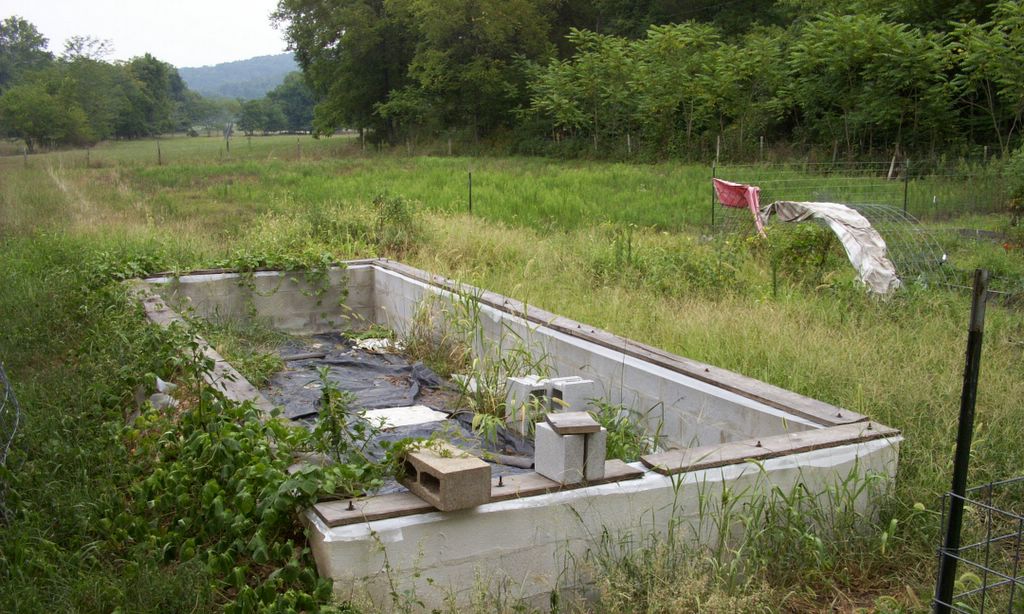
August 2002: We had a cement footer poured, then built short cinderblock walls. The interior of the greenhouse is 7½ feet wide by 21 feet long.

The wire frame is made from five 16 foot x 52 inch cattle panels (which have countless uses and are available at farm stores) that are fastened together with tie wire. The ceiling is about 8 feet high in the center.

The finished greenhouse in April 2003
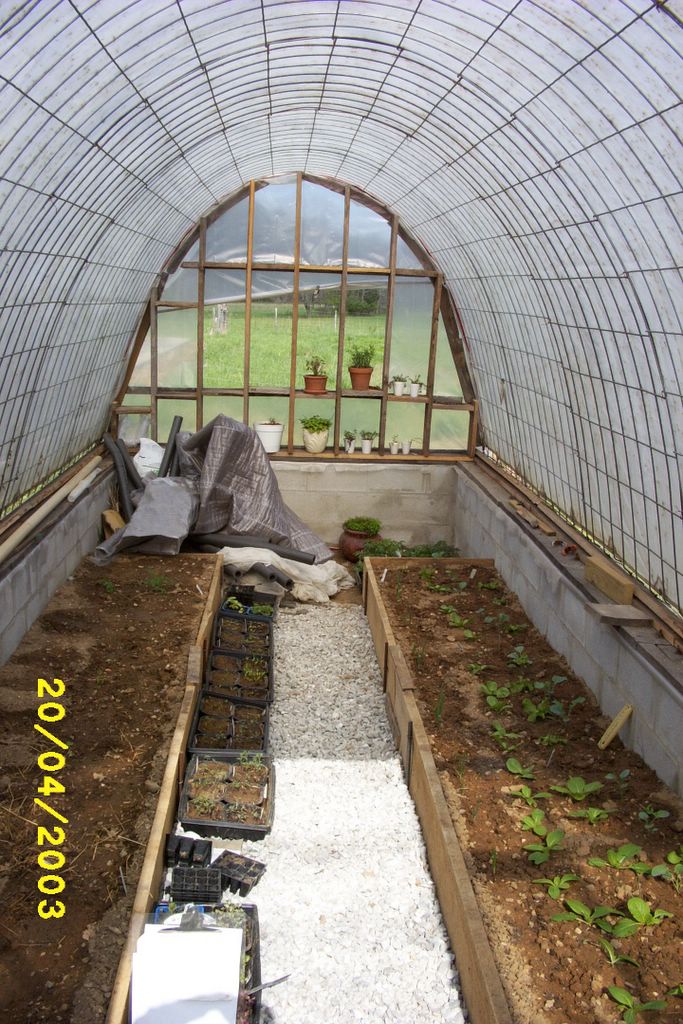
The greenhouse interior in April 2003

The greenhouse interior in May 2003
There's more information about constructing the greenhouse in the comments section of this post.
Hi Kat,
ReplyDeleteYou're very welcome. Chives are consistently one of the first things to pop up in the garden--which makes them such a welcome sight. And fortunately they are hardy, since, as you can see in this photo, they must withstand harsh spring freezes. Another reason I love them so much? They are never attacked by insects and are virtually maintenance free!
Hi Shannon,
Thanks. Okay, I just did some measuring and consulting with my contractor (that would be Joe). First of all, it seems I used the wrong term: we didn't actually have a foundation poured--it was a footer. The "floor" of the greenhouse is bare ground. (So the plants in the raised beds can just send roots straight into the ground if they need the space.)
On top of the footer, Joe built a wall using 8" tall, 16" long cinderblocks--three high. You only see two tiers from the outside, because we dug down inside the greenhouse to make it taller and then put that dirt along the outer walls (gave me space to plant raspberries, plus adds insulation). That way we could fit that 6'8" recycled storm door you see leading into the greenhouse. Inside there is plenty of headroom.
Standing in front of the door, looking at the greenhouse, I measured from the left side where the cattle panel is attached to the wall to the right side where it is attached--I came up with about 8-1/2 feet.
I had a greenhouse before this made from cattle panels that had no footer or cinderblock wall. The panels were just arched over and attached to logs laying on the ground. It was the same idea, with raised beds on either side of a center walkway. The walkway was dug down to make the ceiling a little higher. I could walk in there just fine, but the ceiling was was less than 6 feet high in the center. Hope this helps! : )
P.S. You only need the perimeter wall to be two blocks high to be able to use that size door (it is actually sitting on the bottom block). We just made the wall taller because we knew we were going to be digging down inside the greenhouse.
ReplyDeleteWhat a great greenhouse! I also liked reading your comment response to Shannon - kindof a mini post of its own. I've always dreamed of having a greenhouse but keep saying it isn't possible for me. You've got me thinking that maybe I should try it. Thanks for the info!
ReplyDeleteSeeing your pictures is really motivating me to get out and create my own greenhouse - I even have a mysterious cement pad that we inherited after buying our house (we like to call it our heli-pad) Now that's looking more and more like a great greenhouse spot.
ReplyDeleteI just did a little bit of research on building a greenhouse and got an article about the need for electricity and water and etc. etc. in order to have a greenhouse. Is that true? Because that would be a deal breaker for my budget. How "low maintenance" can my greenhouse be and still do the job?
Hi Jen,
ReplyDeleteHaving this greenhouse has been really wonderful. We're in Zone 5, and I'm able to keep perennial herbs and cold tolerant greens like Swiss chard and arugula growing year round.
My greenhouse is pretty bare bones, as my budget was small, but it suits my needs. I'm not attempting to grow plants on a commercial scale or anything like that. All I wanted to do was keep some stuff alive through winter and give seedlings a head start in spring--basically extend fall and spring.
I do have electricity inside. I use it to power an inexpensive freestanding pedestal fan in the summer when it gets really hot in there, as well as an oil-filled radiator type heater with a thermostat (similar to this one) that I use on the lowest setting for a total of maybe two or three weeks in the winter at the most (just on the nights when it's in the single digits). The rest of the time I just cover up the plants with floating row covers and old bedsheets to keep them from freezing. We've had a few mornings in the teens already this fall, and everything is still doing fine in there.
Outside the greenhouse we installed a freezeless hydrant. This was done when we were running water and electric to our new building which is nearby, so it wasn't much more of an expense. Joe buried the electrical wire underground along with the plumbing pipe so that didn't require any extra work or expense (beyond the purchase of the wire).
Having the water right in the garden is very handy, but before that all I did was run a hose from another hydrant in the yard. I don't have any actual water inside the greenhouse. You really only need that if you're going to set up a drip watering system or a spray mist system. When I water in there, I simply drag the hose inside.
As I'm sure you're finding out through your research, it's very easy to spend a small fortune (or a large one!) on a greenhouse. But you can also do a great deal on a very small budget. And you can always add improvements later.
When I lived at Windridge Farm we built a sunroom/greenhouse onto the house, and it included one feature I really liked: a heavy duty ventilator fan in the wall that was set on a thermostat. When it got to a certain temperature the fan turned on (which opened the vents in the wall) and started blowing out hot air. This was so handy, as even in very cold weather a greenhouse heats up in no time if the sun is shining. The big fan was really noisy, but it wasn't meant for home use. One of these days I'd like to install one in my current greenhouse, but until then even the small freestanding fan does help.
I also put a tarp over the top of the greenhouse in summer to shade it. That makes a huge difference.
Hope this helps. Best of luck with your greenhouse project! : )
I just stumbled on to your blog. What an informational resource! On your greenhouse, is it just thick gauge plastic sheeting covering it? And do you run your space heater 24/7 in the winter or only at night? I am in Ct's northwest corner and it puts us at zone 5. Never thought I could have a greenhouse without spending thousands of dollars. Your greenhouse gives me hope. Thanks!
ReplyDeleteHi Rae,
ReplyDeleteYes, you definitely can have a greenhouse without spending thousands of dollars. It may not be the most beautiful structure in the world, but that's not the point - harvesting more food is! :)
My greenhouse is covered with this superstrong woven poly from Northern Greenhouse Sales. I highly recommend it! I've been using the same piece since I built my original greenhouse 14 years ago. Each year we say we're going to replace it (it's definitely starting to wear in spots), but we don't and it's still going strong.
I only run my space heater during the really cold snaps - maybe a total of 15 or 20 days a year, during a cold winter. Since it has a thermostat, it'll turn itself off during the day if the sun comes out and heats up the air inside, so I'm not wasting extra electricity. If it's cloudy during the day but not super cold, I'll go ahead and turn the heater off (the lowest the thermostat can go is about 50 degrees, and the plants will do fine cooler than that).
That said, I'm only growing cold hardy plants in the greenhouse in winter - things like arugula and Swiss Chard. If I were trying to grow warm weather plants, it would be a whole other situation, but I prefer to work as much with nature as I can, which is why I'm cursing myself for getting this year's tomato plants into the ground so late - they're just now starting to really produce, and I'm already getting tired of covering them up each night because, despite being in the 70s during the day, the temperatures are already dropping into the 30s at night. : )
I really need to read your blog more often.(We share one computer and one internet link for a large generational family here.) Such great ideas and yummy recipes! Do you hsve strong winds in your area? I am in central IL and esp. through the fall and winter we do. We have windfarms in the next county and some proposed not to far from here since the winds are that strong. Was wondering if your type of greenhouse would withstand our winds? Blessings!
ReplyDeleteThis is the most FAB blog - thanks a lot. I'm in Australia and just planning my autumn/fall plantings - I love your greenhouse and all your other posts - thanks! Claire
ReplyDeleteYour greenhouse is great!
ReplyDeleteHow does the outer structure hold up under a snow load? Our snow comes rarely, but in big doses (2-3 feet). When you cover the plants with a sheet, can you leave them covered for a few days or weeks?
Hey Anonymous,
ReplyDeleteThe greenhouse holds up okay under light snowfalls. Anything over a few inches and the top starts to cave in, though you can usually brush off the snow or lightly 'punch' the roof from inside to knock it off. Two or three feet of snow would probably flatten it. :) The whole greenhouse has never been quite the same since it blew apart during a storm a few years ago.
I'm actually planning a new greenhouse, though it's still in the dream and scheme stage right now. :) If we build it ourselves (like we did this one), we'll probably go with this A-Frame design that I found on the Bob's Greenhouse Plastic site - which is who I bought my greenhouse plastic from something like 14 years ago. The stuff is tough! : )
Anyway, they get a LOT of snow up there, as you can see in the photos if you click on that link. If you get 2 to 3 feet of snow at a time, I think that would be the ideal design for you.
As for covering the plants with sheets and blankets during really cold spells, I've done it for several days at a time - maybe even over a week - and they were fine. Anything that's still alive during the winter is pretty much in a sort of hibernation stage. It's best, though, to uncover them at least every few days and let the leaves get a little sunlight during the day if you can.
Hope this helps. Happy growing!
Farmgirl,
ReplyDeleteI'm curious about a couple of things. First, how long is your greenhouse?
Your first green house did not have a frost wall, but your second one does. Do you notice any significant difference in winter growing between the two versions?
Thanks!
Hi Susan,
ReplyDeleteMy apologies for the delayed reply. The interior of the greenhouse is 7½ feet x 21 feet, not including the thickness of the cinder blocks. It's made from five cattle panels which are each 52 inches long.
As for the cinderblock wall, we built it for two reasons: to make the structure more sound, and to make the ceiling higher. It's about 8 feet high in the center, which is great. You could barely stand upright in the center of the original version, which didn't have the walls.
I'm not familiar with the term frost wall, and I don't know if it makes a difference with winter growing. I really didn't use the original greenhouse that much in the winter.
I do know that the interior sides of the blocks often have fuzzy ice on them - that sometimes remains even on sunny days - when the plants themselves aren't frozen, so the walls may actually be keeping things cooler in there during the winter.
I definitely prefer having the walls. :)