Showing posts with label preserving the harvest. Show all posts

Thursday, September 04, 2008

Preserving the Harvest: How to Freeze Tomatoes the Really Easy Way (And Why I Don't Do Much Canning Anymore)


Summer sunshine saved in seconds

For many people, late summer means canning season. It's time to stop stuffing our faces with all of this glorious seasonal bounty and stuff it into jars so we can enjoy it come winter instead. It's a wonderful time of year—except for the actual canning part.

When I moved from urban Northern California to a rural Missouri farm 14 years ago, I planted an enormous kitchen garden and looked forward to my first official canning season with gleeful anticipation.

I admired my inexpensive new boiling water bath canner, stockpiled cases and cases of jars, made sure I had the correct number and type of the special two-part lids, and even bought a handy accessories kit that promised to make my canning adventures a thousand times easier (which it did).

I earmarked nearly all the pages in my trusty home preserving book for beginners and cleared off shelves to store my stash. And then I started canning everything in sight.

I put up dozens of quarts of dill pickles and enough red and yellow tomatoes to make pizza and pasta sauce for at least a couple of years. I made vats of tomato salsa and tomatillo enchilada sauce, and when frost threatened in fall I turned my unripe tomato bounty into this salsa-like green tomato relish, which is one of my most popular recipes.

I bought peaches by the bushel and cooked up enough filling to fill more peach pies and cobblers than I knew I would ever eat. I gathered feed sacks full of apples and pears from a friend of a friend's neglected fruit trees using one of those long-handled grabber thingies, then spent the next couple of weeks cooking up big batches of applesauce, apple pie filling, and several cases of a special creation I christened Autumn Harvest Chutney.

This I bestowed upon friends and family during the holidays until I realized nobody had a clue what to do with it. (I mostly ate it straight from the jar.) I even processed half-pints of homemade lemon curd before I figured out I could polish off an entire batch long before it went bad in the fridge.

One year I turned an eggplant overflow in the garden (my first and last) into caponata, but when I called the 800 canning hotline for processing directions I was sternly informed that I couldn't put up jars of caponata. "Oh yes I can!" I said, hanging up and taking my chances. (I lived.)

After a surprising purple cabbage bounty one spring, I made four pints of pickled purple cabbage. When I fed some to my foodie mother she said, "It tastes something you'd get in an English pub." I was afraid to ask if she meant it as a compliment.

I reveled in my self-sufficiency and would sneak into the crowded pantry (also known as the spare bedroom, the office, my graphic design work area, and the recording studio) to admire the rows and rows of glistening jars that were—unlike the green beans and sweet red peppers and blueberries I'd put in the freezer—safe from spoilage even if there was an extended power outage. I sliced and diced and peeled and parboiled and sweated to within an inch of my life.

And then I got tired of canning.

The truth is, as much as I loved having all those jars of food around, I don't really miss them that much. Over the years I've started doing more year round eating straight from the kitchen garden rather than by way of the pantry.

Last fall I grew several types of hardy greens that lasted well into December, and after they were gone I proceeded to enjoy salads of freshly picked arugula and Swiss chard and from my homemade greenhouse for much of the winter.

I eat my fill of fresh peaches in summer and slice up apples for pies in fall. And besides, I've probably had enough dill pickles and Autumn Harvest Chutney to last me for the rest of my life.

I love knowing how to can, and I'm glad I have the option, but these days I don't let it overwhelm me.

What I'll never stop doing, however, is preserving tomatoes, although now I usually take my chances with the freezer. But it takes an amazing amount of paste tomatoes to fill a quart container, so when I don't have enough to make the whole blanching, peeling, and seeding process worthwhile—or if I'm feeling particularly lazy—I simply stick the tomatoes in a zipper bag, toss it into the freezer, and I'm done. Yep, that's it.

In a pinch you can even freeze big old round tomatoes, but they do take up a lot of space.


Frozen whole tomatoes are the slow cook's winter friend

Whole frozen tomatoes will not, of course, defrost into the sturdy slicers they once were, but they're perfect for cooking down later into sauce or tossing into soups, stews and cozy Dutch oven dinners, such as these slow-cooked lamb shoulder roasts (lamb shanks will work great, too).

If you don't feel like waiting until winter to try this recipe and have some fresh tomatoes on hand, by all means toss them in.

So how do you preserve the harvest? Canning? Freezing? Digging up memories of summer while living on winter root vegetables? Do you have any time-saving secrets to share?

© FarmgirlFare.com, the seasonal foodie farm blog where over the years I may have become a little lazy in the canning department, but the freezers and our tummies always stay happily full.

Thursday, August 17, 2006

Preserving the Harvest: How to Freeze Sweet Peppers - No Special Equipment or Boiling Water Required!

My Favorite Heirloom Sweet Peppers and How To Save Your Own Pepper Seeds

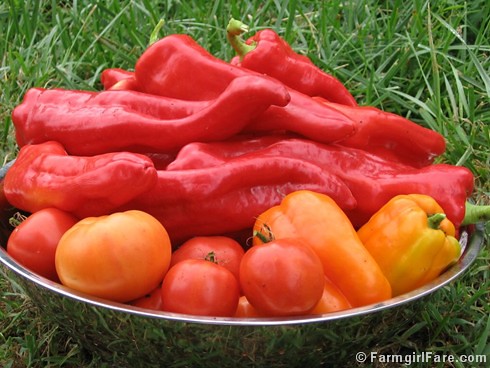
freshly picked in the kitchen garden - aconcagua sweet red peppers, orange sun bell peppers, and heirloom tomatoes - FarmgirlFare.com
Is there anything more beautiful than edible homegrown bounty?

Update: For tips on planting and growing sweet peppers, check out these posts. Happy growing!

Realization Of The Day:
Much of the garden may be in a pitiful state, but my sweet Aconcagua peppers haven't failed me yet.

I've probably tried growing at least fifteen different heirloom varieties of sweet peppers from seed over the last twelve years. Red, orange, yellow, purple, short, fat, tall, thin, you name it, including a few with names I could barely pronounce.

So after all that exploration into the world of sweet peppers, how many kinds will you find in my garden today? Just two. Yep, that's it. Sometimes a girl just has to quit experimenting and settle down with a couple of dependable favorites.

Aconcagua is one of those two. (Orange Sun bells is the other.) Year after year—while the fate of nearly everything else in my garden is uncertain—I always end up with tall, healthy plants loaded down with large, beautiful peppers (knock on wood).

The plants require nothing more than some nice, fertile soil (I amend mine with lots of sheep manure), a layer of mulch such as grass clippings (unless you find pulling weeds relaxing), water at regular intervals, and something to support the plants because they will grow 3 to 4 feet tall and tend to fall over when weighted down with ripening peppers, especially during heavy rainstorms. I tie them to bamboo stakes with recycled baling twine.

Pests are rarely a problem, although the blasted blister beetles have been attacking several of my plants this year. They've only nibbled on the leaves so far, and haven't devoured enough to kill off any of the plants.

While I don't recall any pepper plants being plagued by disease, this year I have found a couple of unripe peppers simply rotting away on the vine for no apparent reason (and they weren't touching the ground). The same thing is happening with the Orange Sun bells, though, and since the majority of the peppers aren't doing it, I haven't bothered to look into this. Weird, unexplainable stuff always goes on in my garden.

I've been saving seeds from my best peppers for years, but the original seeds were purchased from Baker Creek Heirloom Seeds, and they have this to say of Aconcaguas: "Very large, long, frying peppers, up to 11" x 2½". Tall plants give good yields over a long season, and the fruit is very sweet and delicious! This pepper was named after Mt. Aconcagua in Argentina." A packet of 25-50 seeds will set you back $1.35.

The pepper on the left in the photo is 8 inches long and weighs half a pound. In the summer, I tend to eat most of my sweet peppers raw--either cut into chunks and tossed into salads or cut into slices and dipped into something like herbed yogurt cheese or homemade blue cheese dressing. Today I added a couple to a batch of Summer In A Bowl. These are also the peppers I use when I make my Simple Summer Harvest Soup.


They do cook up quite nicely, though (notice Baker Creek even calls them "frying peppers"), so what I do is preserve much of my harvest for cooking up later in the easiest way possible—I freeze them.

No fancy equipment or giant vats of boiling water—like I had in the kitchen today to put up tomatoes—or special containers required. This is how a hot, tired, and lazy gardener freezes her peppers and saves her own pepper seeds.

Take a sharp knife and slice off the stem. Then cut the pepper in half lengthwise and pull out the seeds. Be sure to save the seeds from your best looking specimens. Simply detach them from the membranes and, if they seem a little moist, put them in a nice dry spot for a while. Otherwise stick them right into a little labeled storage bag. I either use itty bitty zipper seal bags or reuse the paper envelopes the seeds I ordered came in.

That's it. You're now ready to grow an even better crop of peppers next year. Isn't it nice when something is so easy?

And freezing your beautiful bounty is just as painless. The pepper halves go right into a freezer bag; no blanching required. You can vacuum seal them with a FoodSaver if you want them to last longer, but it's not necessary. (I do seal up all my green beans with my FoodSaver.)

Just 'spoon' the halves together and pack them tightly into the bags so you don't have a lot of extra air inside. Seal them up, label, and toss into the freezer. Done!

The peppers won't freeze into a massive clump, so you can pull out just a few halves at a time if you like. (If for some reason yours do clump together, spread the pieces out on a baking sheet and freeze until solid, then pack in freezer bags). Your frozen peppers can be added to practically anything: soups and stews, chili, omelets, fritattas.

You can fry the whole halves up in olive oil or roast them in the oven with lots of other veggies or just some little halved potatoes. You can chop them up and add them to salads. Basically you can do anything with them that you could do when they were fresh, but now you can do it during a snowstorm.

This is important, as it is what makes all of this hot and sweaty and dirty work worthwhile. There is nothing more delicious and rewarding than being able to enjoy instant homegrown food in the middle of winter when the garden is covered with a sheet of ice and you can barely remember what a blister beetle even looks like.

© FarmgirlFare.com, the year round foodie farm blog where Farmgirl Susan shares recipes, stories, & photos of her crazy country life on 240 remote Missouri acres - and the freezers are always full.