Pages

Friday, June 30, 2006

How To Use a Scuffle Hoe to Weed the Vegetable Garden - and Why I Love Mine So Much

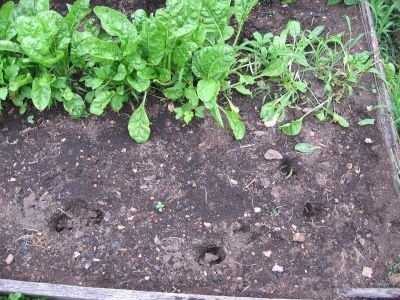
My Thai pink egg tomato patch before. . .


And about 3 minutes after.

Years ago, I read a magazine article in which several well known gardeners named their favorite gardening tool. Someone, I forget who it was, said theirs was the scuffle hoe, which is sometimes called a stirrup hoe.

They went on to describe how it did a superb job of weeding with hardly any effort; you simply pushed and pulled the hoe just under the soil surface and voila! all your pesky weeds were severed at the base, while your surrounding plants and their roots went undisturbed.

I immediately longed for one. The ones I found for sale were pricey. I smacked the longing into submission and convinced myself that my life was totally complete despite its lack of a scuffle hoe.

Fast forward a few years to my first spring, complete with giant garden, in Missouri. I'm wandering around a small hardware store that's having a going out of business sale, and I spy a couple of scuffle hoes. They're simply made, don't even have a brand name, but are under five dollars each. Sold!

I take one home, attack a small patch of weeds with the oh-so-easy, push-pull motion, and watch in disbelief as my new wonder tool fails to do absolutely anything. I can practically hear the weeds and the salesperson laughing at me.

Fast forward several more years. For some reason I can no longer recall, I decide to dust off my scuffle hoe and give it another chance. That famous gardener had raved about it. If he was stranded on a desert island, all he wanted was that stupid, useless hoe.

And then I figured out why.

More below. . .

Thursday, June 29, 2006

What's Growin' On 6/29/06: Flying & Hopping


Realization Of The Day:
I am becoming a bit obsessed with butterflies. . .


. . .and bunnies.

Butterflies are welcome in my garden. Bunnies--not so much. Unfortunately this little rabbit (which looks suspiciously like yesterday's rabbit) appears to have taken up residence. I saw it this morning and then again this evening in the garden. And naturally it is not afraid of me (because nothing is). This evening I had time to walk back into the house, grab the camera case I usually always have slung around my neck, walk back out to the garden, and take the following photos. They're not the greatest because the light was low, and the camera is set on auto everything.

Jeph wondered how I was able to get yesterday's furry invader to sit still long enough to get such a close shot of it. Well, if you saw the few other slightly blurry photos I took tonight besides these, you, too, would quickly realize that not only was this hare in no hurry to hop away, but that it was posing for pictures (before it went right back to eating). This is one brazen bunny.


I realize of course that bunnies in the garden are nothing new, and that even urban dwellers with tiny porch potagers are plagued with ravenous rabbits. I guess I'm just shocked that so many critters are attacking my tiny plot of planted space when I have two dogs (including a beagle who loves to catch and eat rabbits), and they have about two thousand acres to graze upon.

I had something totally different planned to write about today, but at the moment I don't have a clue what it was.

Check It Out!
A Farmgirl Fare reader asked me this morning about the source of my recent score of five gallons of locally grown, organic blueberries (some of which went into my Blueberry Breakfast Bars). My supplier is all sold out for the season, but I went online to see what I could come up with, and I hit upon a fabulous website called Pick Your Own--"where you can find a pick-your-own farm near you!" They have links to farms all across the U.S., plus lists of pick-your-own farms in several other countries, including Australia, Canada, Japan, New Zealand, and the United Kingdom. The site also includes all kinds of other information--everything from picking tips to canning instructions to recommended books. Check it out! (Note: I have noticed that many pick-your-own farms also sell already picked fruits and vegetables for those who don't feel like picking.)

From Garden To Table:
--First Dragon Langerie beans of the season! (Chopped up and tossed into a salad.)
--Baby Swiss Chard from the greenhouse (because the deer haven't found the door to it yet).
--Nero di Toscana cabbage (in above salad). It rallied back nicely after being fried the other day. I also learned from my foodie pal Clare at Eat Stuff in Australia that Nero di Toscana cabbage (which I knew was also called Black Palm Cabbage) has several other names as well, including Cavalo Nero, Black Kale, Tuscan Kale, Lacinato Kale, and Dinosaur Kale. I know, I know. I said cabbage and these say kale, but it looks like the same thing in the photo. I did do a google search for Nero di Toscana cabbage, but nearly all of the links were on my blogs! Anyway, click here to learn more about Cavalo Nero, which I'm pretty sure is my beloved Nero di Toscana. And if it isn't, please let me know.

Wednesday, June 28, 2006

What's Growin' On: 6/28/06


Munch.


Munch Munch.


Munch Munch Munch.

Realization Of The Day:
I don't think Cary is going to starve anytime soon.

Yes, these photos were taken in my garden. Yes, I grew all of those gorgeous weeds in that raised bed she is standing in (that you can barely see for the weeds) myself. Yes, this is one of those times I desperately try to adopt the attitude of that famous gardener who grows gourmet produce for Chez Panisse (and whose name I still cannot recall—anyone?) which is to just let nature take over your garden, even if that means you can barely see the food when you stroll through it.

From Garden To Table:
Yellow, red, and white onions diced, sliced, and chopped into everything.

From Garden To Mouth:
The first few ripe raspberries!


Busted Bunny Trying To Blend

From Garden To Voracious Trespassers:
Too much of my bounty! Why won't they eat the weeds?


From Garden To Cary:
Whatever she wants.

Tuesday, June 27, 2006

What's Growin' On: 6/27/06


Swiss Chard


Arugula

Realization Of The Day:
There is a salad growing out of the gravel walkway in my greenhouse.

If you didn't believe me before when I said how easy it is to grow arugula and other tasty greens, this should convince you. Click here to learn how you can go from seed packet to salad bowl in less than a month. Click here for a tasty way to use up all the arugula you're going to have soon.

Miscellaneous:
I'm not keeping up with my basic garden records as well as I'd hoped since starting this blog. But I am taking lots and lots of photos of the garden at its various stages--something I've never done before and that I am already finding fascinating. It's amazing how much happens in a month!

I am also behind replying to your emails and comments (here and on Farmgirl Fare), and for that I apologize. Someone recently asked me in a comment if I was really only one person. Unfortunately, yes I am. I could definitely use a couple of clones right about now (especially one who adores housework). But really, who couldn't?

Monday, June 26, 2006

What's Growin' On: 6/26/06


This is not a Dragon Langerie bean.


These are Dragon Langerie beans.


Yet both plants were grown from seeds out of the same packet.


And these are not San Marzano tomatoes.

Realization Of The Day:
My garden is having an identity crisis.

I have no idea what is going on with these beans, but at this point I do not care. The plants are beautiful and full of blooms and bounty. Only one other row of beans (the Straight 'N' Narrows) has come up in the garden this year, despite all of my various plantings. I did a little math and figured out I've had a 25% success rate so far with the beans. That sucks.

But I have not given up. No way. I am determined to have a frozen harvest in the freezer if it takes me all summer to get it. So today (a fertile day in the first quarter--click here if you want to know more about what this means) I grabbed every seed packet of beans I could find and did my fourth? fifth? whatever bean planting of the year. I covered all the bases. Hell, I even planted pole beans, and those of you who read about my sugar snap pea adventures know how fond I am of trellising. (See, I'm trying.) I already have the bamboo stake teepee thingie in place and everything. Now all I need now is for some damn beans to actually sprout. We could use some rain, too, so I guess tomorrow will be laundry day.

So here's what all that went into the ground today:
--Emerite Haricot Vert (Pinetree Garden Seeds, 2005 packet)
'Early [oops] and productive, stringless 5" to 8" pole beans. Flavorful. 58 days.'

--Straight 'N' Narrow Haricot Vert (Pinetree, 2006 and 2005 packets)
'Long shoestring beans with great flavor. 53 days.' (These are one of my all time favorite beans.)

--Sequoia Bush Bean (Pinetree, 2003 packet--don't worry, I sowed them really thickly)
'Beautiful, purple, romano-type. Good flavor. Prolific. 60 days.' (Okay, it's all coming back to me--I bought several packets of these in 2003 because they were fabulous, and it was the last year they were going to offer them.)

--Masai Bush Bean (Pinetree, 2005 packet)
'Large yields of 4" beans. Great for containers. 47 days.' (I've had really good luck with these before, though they aren't as tasty as the Straight 'N' Narrow. But at this point I'll take anything.)

As for the un-San Marzanos, well, that's a little trickier. I'm almost nearly absolutely positively 100% pretty sure I didn't mix up any seedling labels this year, so it must have been a cross-pollination problem last year (I save seeds from the best looking specimens each year).

The question is, do I yank out the several beautiful and healthy plants that are obviously not putting on the familiar teardrop-shaped plum tomatoes (but are loaded with some kind of nice looking tomato) so that this year's San Marzano seeds come out pure (we're talking the best of 10 years of saving seeds here)--or do I say the hell with it, take whatever tomatoes I can get this year, and worry about next year next year? I already pulled up two plants out of the San Marzano bed a few weeks ago before they even had fruit on them simply because the leaves weren't the same shape as the others. I did have replacement stock still kicking around, though they're awfully small compared to their neighbors--and at this point who knows what they'll turn out to be. That whole bed is a mess. Which is really odd because I've never had this problem before.

This is a difficult dilemma indeed, and I definitely don't have enough brain cells on duty at the moment to make a command decision. Besides, it's time to go tuck my Manure Factory Empire in the barn for the night.

9:45pm Update: Hmmm. Maybe being thrown to the ground and dragged around the barnyard several times by sheep who aren't in the mood for any wormer tonight, thank you, actually knocked some sense into me. If I am now thinking correctly, because all of the plants in the San Marzano bed have fruit on them now, it's already too late to stave off my possible tomato cross-pollination problem. The pollination has already occurred (duh). Pulling up the odd plants now would assure that future questionable blooms wouldn't be available for cross-pollination, but. . . Okay, now I really don't know what to do.

Sunday, June 25, 2006

What's Growin' On: 6/25/06


Realization Of The Day:
I water these happy little basil seedlings twice a day, and yet I can't seem to remember to move them from the greenhouse into the ground.

Realization #2:
The days may be longer, but they sure don't contain any extra time. Lots more to post--one of these days.

Saturday, June 24, 2006

Spiderwort! A Beautiful, Easy to Grow Flowering Perennial that Attracts Butterflies and Other Pollinators


Realization Of The Day:
I love spiderwort. The cheerful flowers open up early in the morning, so they're often one of the first things I see when I step outside.


I highly recommend spiderwort for anyone who loves growing plants that require virtually no maintenance, flower for weeks, survive crazy weather fluctuations including extreme heat and cold, and can mysteriously pop up 100 feet from where originally planted. (I never did get around to moving those three extremely healthy clumps that appeared in one of the mini greenhouse raised beds in the garden, but the flowers are beautiful.)


My first spiderwort plants were given to me when I moved to my first Missouri farm back in 1995 by a 76-year-old gardening neighbor who dug them up from her garden. This is the best way to get plants because they're already acclimated to your growing conditions. The spiderwort I have now was dug up and brought with me when I moved to this farm in 2000.


Pollinators also love spiderwort, and planting some is a great way to attract them to your garden.


No plant is perfect, and there are a few things about spiderwort I should disclose. The first is that the plants are fairly tall and do tend to spread, often crowding and shading out surrounding plants. It would probably do best in a place of its own.

When I do get around to moving the plants out of the mini greenhouse bed, I plan to relocate them somewhere where nothing else will grow. I'm betting they'll do just fine.

The mature plants also have a tendency, at least in my garden, to fall over due to high winds and heavy thunderstorms—and possibly dog attack, though I haven't caught them in the act yet. 2011 update: dogs, donkeys, cats, and chickens have all been busted knocking down the spiderwort, and yet year after year it continues to spread and thrive.

And finally. . .


Pollinators and I aren't the only ones who love spiderwort.

Have you ever grown spiderwort? Any stories, fun facts, or growing tips to share?

© FarmgirlFare.com

Friday, June 23, 2006

What's Growin' On: 6/23/06


Newly Planted Lemon Thyme In The Greenhouse

Realization Of The Day:
I'm going to need a lot more lemon thyme.

A few weeks ago I posted a photo of some lemon thyme along with a request for suggestions on how to use it in the kitchen. I received so many delicious sounding ideas and recipes (click here to read them) that I transplanted one of my two pots of lemon thyme into a raised bed in the greenhouse in the hopes that it will spread all over the place.

I did taste it first to make sure I liked it. Several people said it went well with chicken, so I used some in my super simple herb and spice mix that I rub on chicken before roasting it. It was fantastic. I'll post the recipe soon. In the meantime, I'm looking forward to trying more of your recommendations.

There is, however, one thing that will never touch my lemon thyme. There was no way my pal Kevin (a professional chef who shares his talents in the kitchen over at Seriously Good) could have known that his seemingly innocent suggestion to add some lemon thyme "to sauteed sugar snaps" would bring back a long forgotten garden memory. And it was timely, too, as gardeners everywhere are celebrating their beautiful harvests. Click here to find out why, 11 years later, I still don't plant sugar snap peas in my garden.

Harvesting Sugar Snap Peas In The Trenches


My Garden Today: Not A Single Snap Pea In Sight

Experimenting in the garden can be exciting and rewarding. The boring gardener is one who contentedly cultivates the same reassuring standbys year after year, reluctant to take a chance, intimidated by the unknown. Pass the zucchini and cherry tomatoes please--no purple bush beans or Spanish black radishes for these cautious souls! The adventurous gardener, on the other hand, is a daring thrill-seeker, willing to try growing anything at least once. To him or her, a packet of unfamiliar seeds is the first step of a bargain-priced journey into unexplored territory. Of course if you have no idea what you are growing, you might find yourself in a bit of an entanglement.

When I moved to Windridge Farm in 1995 and my kitchen garden suddenly grew from one 7-foot x 25-foot plot to twenty 7-foot x 25-foot plots, the possibilities seemed endless. I went crazy and ordered dozens of types of seeds: vegetables I had always dreamed of growing, herbs I had read about in books, exotic produce from the pages of glossy gourmet cooking magazines. It was a fascinating and educational season as I harvested kohlrabi, escarole, arugula, celeriac, and many other tasty things for the first time. For the most part I did not encounter any major difficulties, even from the plants with which I was completely unfamilar. No, the only complications sprouted from an unassuming little packet simply labeled Sugar Snap Peas.

The only thing I knew about peas was that they could be planted early, so I carefully placed the shriveled little bits in the ground before anything else. As I waited for them to emerge, I tried to imagine the first ambrosial bite from the garden. That got me wondering just exactly what I was growing. I decided to ask around.

"So, do you know what sugar snap peas are?" I would casually insert into conversations. Such a simple question, such pathetic answers. The responses ranged from, "Sure, the company I work for sells frozen packages of those. They're uh. . .uh. . ." to a very emphatic, "I hate peas." I was clearly on my own.

The spring days were sunny and warm, and my pea seedlings quickly began shooting up. Straight up, and up, and up. Then they started to fall over. Something was obviously missing, and I realized it was a support system. Never a big fan of trellising and all that complicated stuff (my one short skirmish with pole beans had been a dismal failure), I realized that I had inadvertantly planted something that would require me to erect some sort of vertical structure. Oh joy.

Unenthusiastic but determined to assist my first crop of the year, I looked around the farm for a creative and cheap solution and found it in fencing supplies and a ball of string. I decided I would place 6-foot metal fenceposts at each corner of the plot and then run 48-inch high woven-wire fencing along the two longest sides. The peas were planted in short rows perpendicular to the fencing, so I would tie pieces of string to the top of each fence, suspending them over the rows. Then to the main string I would tie shorter pieces which would hang down to each plant. All I would have to do is wrap the plants' tendrils around the string, and simply let string and vine hold each other in place. It was a brilliant idea, and I executed it magnificently, a true testament to simplicity and resourcefulness. Even my husband (who had offered to build me a "real" trellis) was impressed. The peas grew like mad and were soon covered with beautiful white blossoms.

Everything looked great--for about a week.

Since I had only put fenceposts at the ends of the 25-foot long plot, the woven wire fencing was a little loose. I really didn't see it as a problem; I was supporting peas, not trees. Yeah, right. The taller those vines got, the more they pulled down the strings. Soon my 48-inch high fencing was about a foot and a half off the ground. The vines didn't stay put on their individual support strings either; instead they lashed out their tendrils toward anything they could grasp onto and grew in all sorts of directions, including back down toward the ground. Add all of this to the fact that I never took harvesting into consideration (only 48 inches high--what was I thinking?), and you have a hopeless mess. So I did what any sensible gardener would do: I ignored it.

It is hard to ignore perfectly edible food when it is hanging on the vine and filling you with guilt every time you pass by it though, and after a while I realized that somehow I would have to pick those peas. But first I managed to prolong the task for another two weeks by utilizing the rationalization that if I waited for all of the peas to mature, I would only have to harvest once.

When it got to the point where the massive pods were practically bursting open, I grabbed a basket and my creative ingenuity and headed out to the garden. First I tried leaning over the woven wire fencing and simply grabbing whatever I could reach. Unfortunately that amounted to only six pods and the very real image of falling into the rampant foliage and never being able to climb out. No, I would have to somehow get inside that plot. I went over to one end and crouched down to examine the available crawl space between the strings and the ground. Things looked promising so I got down on my hands and knees. Not that much space. I lay down flat on the ground. Better. I tossed the basket into the green mass ahead and began to drag myself along with my elbows.

Did I mention that it had recently rained? Or that I had never gotten around to mulching the peas, and weeding, of course, had been impossible? As I inched along, I felt like I was in some bad war movie or military training exercise. I was deep in the battle trenches, but my only enemy was the fool who had contrived this idiotic trellis system--me.

Three feet in and I was face to face with big fat pods. Ten feet in and I was stuck. As I tried to untangle the tendrils from my long hair, I realized I had not fomulated a "back up" plan. I thought about cutting my way out but did not have my clippers. While I harvested I came to a decision; I would sacrifice the pea plants. I raised myself up and pushed my way out, arms and legs flailing, tendrils breaking, peas flying. But at least I was free.

I ended up with about five pounds of bounty, and as I tried to figure out how to prepare it, I came to a disappointing realization: I don't really like sugar snap peas. The fact that they had gotten way too big didn't help the taste either. Unwilling to toss them out after all that effort, they were relegated to the back of the refrigerator where they sat for weeks until the space was needed for something else. I took the by-then-slimy peas and gave them to the sheep. They refused to come near them, and so I gathered up my first crop of the season and threw it into the compost pile.

I still believe in taking risks and trying new things in the garden, though now I usually do a little bit of research before planting. And I never venture into the plots without my battle fatigues--it's a war zone out there.

This essay originally appeared in the Spring 1997 issue of Germinations. Copyright 1997-2006 FarmgirlFare.com.

Thursday, June 22, 2006

What's Growin' On: 6/22/06


Fried Food--Still In Shock View


Letting Out A Muffled Cry View

Click on photos for close-up Full Blown Sobbing Views.


Realization Of The Day:
Oriole Orange chard, Nero di Toscana cabbage, and basil don't like it when you cover them with a deer deterring plastic tarp for the night and then forget about the tarp until late the next day--especially when it is 90 degrees and very, very sunny outside.

Blogger is not cooperating today, and neither is my dial-up connection. As I mentioned on Monday, I have all kinds of interesting posts lined up, but for now I guess I'd better head back outside. Too bad--blogging usually gives me a great excuse to hide out from the heat in my little office (which is the only air-conditioned room in the house). Hmmm. Looks like I'd have to sign off anyway, as I just spotted wayward Martha and her twins in the hayfield, and some very loud, non-stop thunder has begun. Maybe it will cool down and we'll get some much needed rain.

Tuesday, June 20, 2006

What's Growin' On 6/20/06: Preparing to Burst Into Color


Echinacea Flower

Realization Of The Day:
I've never really looked into the center of an echinacea flower at this early stage of bloom before. It's absolutely mesmerizing. (Click on the photo for an enlarged view.)

Monday, June 19, 2006

What's Growin' On: 6/19/06


Cary Lunching In The Greenhouse

Realization Of The Day:
The best tasting part of arugula is apparently the flowers. Who knew?

Coming Up
Lots and lots to share, including another gardening tool (along with something else) I absolutely "Can't Live Without," three quick and easy recipes that make delicious use of what's ready to harvest now, what I've been up to in the garden, my Gardening On The Cheap tomato cages, a few new garden stuff discoveries, and more (including that promised article on using grass clippings as mulch). When? Soon! (I hope.)

Sunday, June 18, 2006

What's Growin' On: 6/18/06


One Glorious 2005 Beet Plant Gone To Seed

Realization Of The Day:
I should never have to buy beet seeds again.

Saturday, June 17, 2006

Garden Journal 6/17/06: Growing and Harvesting Hardneck Garlic


Freshly dug garlic

Realization Of The Day:
2006 is not My Year Of Garlic.


This morning, in the hopes that today's forecasted rain really was going to show up, I dug up the plot of garlic that I planted back in November (click here), using my trusty Korean style hand plow (also called an EZ-Digger) of course.

I'm sure that at some point I must have had a lousier harvest than this, but at the moment I cannot recall it. Well, except for the year I never got around to planting any garlic at all—which was the beginning of my garlic downslide. I honestly cannot remember if that was last year or the year before. This is why I now have a garden blog.

More below. . .

Friday, June 16, 2006

What's Growin' On 6/16/06: Deer Attack


This is not what a gardener wants to wake up to.

Realization Of The Day:
Okay, the Irish Spring soap thing totally does not work. Yes, that little black square right next to where my gorgeous Giant Fordhook chard used to be (click here) is a bar of Irish Spring in an old piece of stocking. I also hung two bars on the fence right next to the plot.

I'd heard about this deer deterrent trick for years but never actually tried it until two days ago. I'm now wondering if this obvious myth has been perpetuated by the makers of Irish Spring soap. I mean, I just bought 10 bars of the stuff.

More below. . .

Thursday, June 15, 2006

What's Growin' On: 6/15/06


Wild Gooseberries At The Edge Of The Hayfield


Ripening Gooseberries

Realization Of The Day:
Gooseberries are gorgeous. But I still haven't acquired a taste for them. (Or found a recipe that doesn't call for burying them in a pile of sugar.)

We are obviously in the midst of berry season on the farm. I have a few late strawberries in the garden, wild black rasberries, wild gooseberries, and mulberries in the hayfield. In a few short weeks hopefully the patches of wild blackberries scattered about the farm will be brimming with deep, dark fruit. And yesterday I picked up the five gallons (!) of organic blueberries I pre-ordered last January from a local small grower.

So what did I have for breakfast this morning? A slice of homemade apple pie of course.

Tuesday, June 13, 2006

What's Growin' On: 6/13/06


Four Month Old Tomato Seedlings Tossed Into The Compost Pile This Morning

Realization Of The Day:
Sometimes admitting defeat feels really, really liberating.

Minding The Moonsigns:
Today, tomorrow, and Saturday are all fertile days in the third quarter. These are excellent days for transplanting--tiny seedlings into individual plugs, larger seedlings into the garden, potted plants into roomier quarters, etc. Also good days to plant things that grow underground such as potatoes and garlic. Click here to learn more about this whole minding the moonsigns business.


The First Spring Onions!

From Garden To Table:
These onions sliced and piled on homegrown, grass-fed, grilled beef burgers. YUM.

Questions From Readers: Garden Pests!
Tabitha is having a big problem (in her gorgeous spring garden) with aphids returning to her tomato plants (despite using various organic methods on them), and super gardener Jeph has kindly offered to seek out solutions for a groundhog-infested co-worker.
Can we help them?

Beyond The Garden Gate:
I'm still in Haying Recovery Mode, so it'll probably be another day or two before I can properly respond to your comments and put up meatier (veggier?) posts. I have lots of photos and info to share, just need more time. (Don't we all?) Thanks for your patience, kind words, enthusiasm for this blog, helpful advice, and support.

Monday, June 12, 2006

What's Growin' On: 6/12/06


This Is The Raised Bed In Yesterday's Photo

Realization Of The Day:
There's venison in the freezer, and I think it's about time to fry some up. If you can't beat 'em, eat 'em.

Sunday, June 11, 2006

What's Growin' On: 6/11/06


Straight 'N' Narrow Beans, Giant Fordhook Chard, & Way Too Much Bare Dirt

Realization Of The Day:
I forgot to make a note of what kind of beans I re-planted here and when I planted them. But it doesn't seem to matter, as they appear to be doing a no-show like the three out of four rows from the first planting.

This has not been a good year for beans in my garden. And last year was pretty pitiful, too. Surprising since this is one of the few crops I've been able to totally depend on doing well year after year--no matter what variety I plant and even when I plant them. They are easy to grow, not fussy at all, can withstand our hot and humid summers without complaining, and require practically no attention other than watering. Usually by this time I am already happily tossing bags of blanched and sealed beans (I love my FoodSaver) into the freezer to be enjoyed all winter long.

I think there are several reasons for the bummer bean crop so far. The soil can't be one of them, though, as I did get that single row of Straight 'N' Narrows to come up. And I've successfully grown beans in nearly all of my raised beds at one time or another (rotate! rotate! rotate!) even though I think the soil is a little different in each of them.

First of all, some of the beans I planted were a few years old, though this has never been a problem before. (Where oh where are all the 2006 packets of beans I'm pretty sure I bought?)

Secondly, we have about a zillion moles living on the farm with us, and I think I spotted mole tunnels going right along my rows of planted beans the other day. I know that moles can paddle their way through 160 feet of dirt in one night, but I have no idea what they eat. My dried and buried beans?

Above ground, this poor plot has also been visited more than once by at least one bean munching thief, though the plants have come back nicely. It was most likely a deer or rabbit (I've seen both near the garden), and I have also found some sort of hoof/paw prints running across the bed on more than one morning. Then there is the big scratched out area you can see in the photo. I'm blaming one of the cats on that.

Who knows, though. A lot of stuff goes on in the garden when I am not looking. At least I have the one row of Straight 'N' Narrow, and I noticed flowers on it just a little while ago. I love these thin, sweet filet beans, and on my way from the garden to the computer, I happened upon the rest of the 2006 packet of them (for some reason I have little bundles of seed packets in about 16 places around the house this year). Why I didn't plant them when I planted the other row back in April I have no idea. Maybe I wanted to use up the old ones first. Even I can't figure out how my mind works half the time. Must be all the fresh air.

Saturday, June 10, 2006

What's Growin' On: 6/10/06


Flowering Red Potato Plants

Realization Of The Day:
Judging by the size of the plants and the flowers above, the experimental bed of red potatoes I planted on April 25th appears to be a success.

I have been meaning to put up the step-by-step photos showing how I turned a grassy place into garden space in under an hour without tilling, digging, or mowing, but now I'm thinking I should wait to see how the harvest turns out. That way you'll know what to expect if you decide to try it yourself (though unfortunately you'll probably have to wait until next year).

Miscellaneous:
Speaking of garden experiments, if you're interested in an inexpensive, ingenious way to support your tomato plants (and while you're waiting for me to show you my Gardening On The Cheap tomato cages), click here to see what Steven is trying over at Dirt Sun Rain. I recently decided that ultimately the best way to grow all of my tomato plants would be in single file rows, rather than crammed into my 4'x8' raised beds. If I ever get around to creating some long and skinny beds, I may try his method. Of course I'll wait to see how he likes it first. Oh the joy of having fellow gardening pals to try things out for you!

One little warning, though: If your garden this year has been short on attention and long on weeds (boy can I grow some dandies--and huge, too!), you may feel the green begin to tint your skin once you catch sight of Steven's garden. It's fabulous.

From Garden To Table:
--Wonderful salads of baby chard and Nero di Toscana cabbage (although the race against the worms for the cabbage has already begun--I'll let you know if the diatomaceous earth works this time).

--Lettuce (still!) I can't say enough good things about the Petite Rouge lettuce from Baker Creek Heirloom Seeds I direct seeded in my raised lettuce bed this year. Even after I harvested the entire bed a few weeks ago (I have pictures of that experiment, too, that I'll hopefully post someday), it grew back with a happy vengeance. And despite recent temps in the upper 80sF and high humidity (and that I unshaded it--click here to read about shading lettuce), it is as delicious as ever. Today is supposed to be up in the 90s, though, so I harvested all of it. Baker Creek says this about Petite Rouge lettuce: "An exciting true baby red romaine! This cute specialty lettuce is hardy and easy to grow in many climates. A hard-to-find variety." Packets are $1.50 for 700 seeds. I highly recommend them, especially if you are in a warm climate or if your springs go from 24F to 90F in the blink of an eye like ours do here in Missouri.

Friday, June 09, 2006

What's Growin' On: 6/9/06


Wild Black Raspberries

Realization Of The Day (well, yesterday really):
There was definitely a sweet side to yesterday's hot, sweaty, and exhausting Hay Pick Up Day #1. The black raspberries along the edge of the hayfield have begun to ripen, and it looks like there will be enough this year for several handfuls of the sweet and dainty fruits. The majority weren't ripe yet, but I did manage to find a few perfect ones to pop into my mouth.

I'll be back out picking up bales again tomorrow and will definitely be checking on their progress. I'd never even heard of black raspberries until I moved to Missouri. Then it was so many years before I actually saw some that I was beginning to doubt their existence. Boy was I missing out. Since we don't tend the bushes at all, our harvest is always small. Just enough to really, really enjoy these once-a-year, exquisite little treats.

Out Of My Inbox:
Bird Netting Question From A Reader

Melissa at Flatlander (who did the opposite of what I did--moved from the Midwest to California) sent me a gardening question that I am ill-equipped to answer--thank goodness! Birds are (knock on wood) one of the few pests that don't manage to help themselves to an ample portion of my precious garden bounty each year (though I think they do dine on the black raspberries). But she has a problem with them and is desperately trying to find a rational solution. I told her I couldn't help, but that I bet some of you would be able to (especially after receiving so many suggestions on what to do with my lemon thyme--thank you!). And perhaps those of us who haven't been attacked by The Birds yet will be able to store this knowledge away for when the inevitable happens. I'll let her explain the situation:

I have a gardening question for you. Last year, I had problems with the birds eating my tomatoes. I don't want to use any "scare" techniques because I'm happy to have birds in my yard (just not in the tomatoes), so I've purchased some bird netting to defend my garden. I've been scouring books and the internet, but I have yet to find informative instructions or advice on the best way to install the netting. I'm sure there must be a good way to set it up so that I can still access the plants.

Here's what I'm thinking so far: I could make a frame for the netting, cover the garden, and install some type of door or flap on one or two sides (which I could open and close) so I could get inside the netting & access the beds. The beds (there are 3 side by side) are about 6' x 16' (total size). And I think staked tomatoes (I have indeterminates and determinates) get pretty tall, at least 5' right? But my concern is that the frame would be ridiculously large, but maybe it wouldn't be. I think I'd have to do some sewing with fishing line, and maybe attach the netting to the frame with zip-ties? I'm not really sure what would work best, but I am sure that I don't want giant holes being ripped through the netting. I'm also wondering the best way to anchor the netting to the ground. Anyway, those are the possible problems I'm imagining.

Do you have any advice or suggestions or pictures of what's worked for you? ANY information would be well received!


I think her frame idea sounds good but awfully complicated (and possibly expensive), though I have seen photos of a fairly large blueberry patch that had a wire cage built around the entire thing. (The blueberries were a cash crop, so all precautions were worth the trouble and expense.)

Your ideas? Suggestions?

Thursday, June 08, 2006

I Can't Live Without. . . My Oriental Garden Tool!


Ho-Mi, E-Z Digger, Korean Hand Cultivator: It's Wonderful Whatever You Call It

I often mention Pinetree Garden Seeds in Maine, as I have been happily buying from them for over 10 years. The quality of their seeds is excellent, and their prices are very reasonable. They specialize in vegetable seeds for the home gardener, and most seed packets cost less than a dollar. In their catalog they state, "Since we deal only with home gardeners, we don't worry about shipping or machine harvesting characteristics. What we do worry about is flavor, space, efficiency, beauty, and uniqueness." Sounds good to me.

While I have purchased everything from cutting celery seeds to strawberry plants from their informative print catalog (they also have an online catalog), by far the best items I have ordered were in the Garden and Kitchen Products sections. These things actually changed my life.

One of these things is my Oriental Garden Tool. Since buying mine a dozen years ago, I have seen them for sale in various places with various names, but Pinetree still simply calls it an Oriental Garden Tool (catalog item # H151) and their price of $13.95 can't be beat. (For purchases up to $19.99, shipping is only $3.75.)

This centuries-old ingenious device does it all: weeding, opening and closing furrows, digging holes for seedlings. It is pretty much the only hand tool I use in the garden. One year I planted, hilled up, and harvested 150 feet of potatoes with it. It conforms to your hand and range of motion so easily that other trowels suddenly feel clumsy. I misplaced mine once, and I felt so helpless without it that I nearly had a replacement shipped to me by overnight delivery. It is that wonderful.


Pinetree say it's "an all time favorite tool of ours. The blade is 7 inches long and convex, like that of a plow with a sharp point broadening to a width of 3 inches. Terrific for digging because the sharp point cuts deep, but the smooth surface of the blade gently pushes the soil to the surface to trench rows. Great for digging holes for plants and bulbs. Hand-forged and designed for right-handed people."

It does many of the same jobs that a hoe does, but you can do them while kneeling. So if back or sciatic problems prevent you from bending over and using a hoe, this is most definitely the tool for you.

Words really don't do justice to my Oriental Garden Tool. On top of everything else, it is exactly one foot long, so you can also use it to do all your measuring while you're planting. I highly recommend one for any type of gardener. It would also make a great gift for all your gardening friends and family members.

Click here and here and here for a few other things I can't live without.

© Copyright FarmgirlFare.com, the foodie farm blog where Farmgirl Susan shares recipes, stories, and photos from her crazy country life on 240 remote Missouri acres—and sometimes it's the littlest things, like a simple tool, that can make the biggest difference in the garden.

Tuesday, June 06, 2006

What's Growin' On: 6/6/06


Lemon Thyme

Realization Of The Day:
Some of the culinary herbs in my garden never actually make it into the kitchen--and it isn't because they die on me (okay, sometimes it is). But take this lemon thyme, for example. It's flourishing--and I have no idea what to do with it.

Any suggestions?

Minding The Moonsigns:
Today through Friday are fertile days in the second quarter. Don't know what this means? Click here to read my review of Louise Riotte's fascinating book, Astrological Gardening: The Ancient Wisdom of Successful Planting & Harvesting by the Stars.

Miscellaneous:
--Several weeks ago Fancy Free asked whether grass clippings used as mulch should be allowed to dry out first. This led to a little research on my end, and an informative article that is about 2/3 completed. I realize that she is probably still wondering about the answer to her simple question though, so until I get the article posted, here's what I learned:

Although I've used grass clippings in every stage from freshly cut to dried for several days, the popular opinion seems to be that you should let them dry out before applying them as mulch in the garden. Why? I'll explain that in the article. Thanks for your patience, Fancy Free.

--People often ask me how I find enough time to tend to the farm, garden, three blogs, and life in general. When things get really busy around the farm, I don't. And, for obvious reasons, the blogs get nudged toward the bottom of the priority list. This is one of those times. Bear with me, I should be back to more blogging soon.

Sunday, June 04, 2006

What's Growin' On: 6/4/06


Realization Of The Day:
This is the downside to direct seeding.

Yes, there really are Oriole Orange Chard and Nero di Toscana (also called Black Palm Tree) Cabbage seedlings somewhere in there among the weeds. (The beautiful baby Nero di Toscana leaves are wonderful in salads, as are the baby chard leaves, of course.) I realize that this is partly my own fault, as that thick and extremely healthy looking lawn coming up in my raised bed is no doubt due to my amending the soil with lots of sheep manure and bedding hay from the barn. But still.


That grass grows so fast, I was afraid to let the seedlings get any taller before trying to do any weeding. But I don't have the patience for this kind of work, and by the time I was maybe halfway done, I was gnashing my teeth and pulling up way too many of the cabbage seedlings along with the grass.


Fortunately I had a little tranquilizer to help keep me calm.

And there was also an upside to this sad scenario. . .


Realization #2:
Volunteer basil seedlings were hiding in the weeds!

This is fabulous news because the basil I finally got around to starting in containers a few weeks ago isn't even this big yet. And I simply cannot have a garden without basil!